Applications
Agricultural Applications
Please visit LMU Vegetation Apps Documentation for more information.
Classification Dataset Manager
The Classification Dataset Manager allows a) to create a new dataset from various sources, b) presents class statistics, c) supports editing of class names and colors, and d) let’s you easily draw a random sample.
Classification Workflow (advanced)
The Classification Workflow application let’s you easily perform classification analysis and mapping tasks using remote sensing data.
Quick Mapping
In the Quick Mapping section you can very easily define your training dataset, fit a classifier and predict a classification layer, with only a few clicks.
For a more elaborated analysis see the Detailed Analysis section.
Detailed Analysis
In the Detailed Analysis section you have more control over individual analysis steps. When performing a detailed analysis, you can basically go through every subsection from left to right. But, depending on the usecase, it is also possible to skip individual steps you’re not interested in.
Dataset
You have various options to create a dataset for subsequent analysis: select a Source option and click create dataset to create a new dataset`.
In the Editor, category colors and names, and feature names can be changed and saved.
By using the various controls in the Draw samples section, you can easily define a training-test-split setup. The number of training and test samples to be drawn for each category are listed, and also editable, inside the Editor.
Click split dataset to perform the split, resulting in a training and a test dataset, that can be used in subsequent analysis.
Classifier
In the Classifier section you can either select a Predifined classifier or provide a user-defined Python Code snipped. See the https://scikit-learn.org/ documentation for a complete overview.
Click create classifier to create an (unfitted) classifier, that can be used in subsequent analysis.
Feature Clustering
In the Feature Clustering section you can perform an unsupervised Feature redundancy analysis, that clusters similar features together: select a Dataset, an Algorithm and click cluster features to create and an Output report.
After inspecting the report you can perform a Feature subset selection: select a suitable Number of features and click select features to create a training and a test dataset with fewer features, that are less correlated and can be used in subsequent analysis.
Feature Ranking
In the Feature Ranking section you can perform a supervised Feature importance analysis, that ranks features in terms of their importance for the classification task at hand: select a Dataset, an Algorithm and click :guilabel:`rank features to create and an Output report.
After inspecting the report you can perform a Feature subset selection: select a suitable Number of features and click select features to create a training and a test dataset with fewer features, that are most important and can be used in subsequent analysis.
Model
In the Model section you can perform Model fitting: select a Dataset and click fit classifier to create a fitted Output classifier, that is used in subsequent analysis.
For Model performance analysis select an Algorithm and click assess performance to create an Output report.
Classification
In the Classification section you can perform Map prediction: select a Raster layer with features that matches the features used in Model fitting. Click predict output products to create an Output classification layer and/or an Output class probability layer. Note that outputs are opened inside the EnMAP-Box Data Sources panel.
For Map accuracy and area estimation select a Ground truth categorized layer and click assess performance to create an Output report.
Settings
In the Settings section you can specify the Output directory (e.g. C:/Users/USERNAME/AppData/Local/Temp/EnMAPBox/ClassificationWorkflow), that is used as the default file destination path, when creating file outputs. Note that each output file wigdet (e.g. Output dataset) has a default basename (e.g. dataset.pkl), that is used to create a default file destination (e.g. C:/Users/USERNAME/AppData/Local/Temp/EnMAPBox/ClassificationWorkflow/dataset.pkl). If the default file destination already exists, the basename is enumerated (e.g. .dataset_2.pkl) to avoid overwriting existing outputs.
Log
Classification Workflow (deprecated)
You can find this application in the menu bar
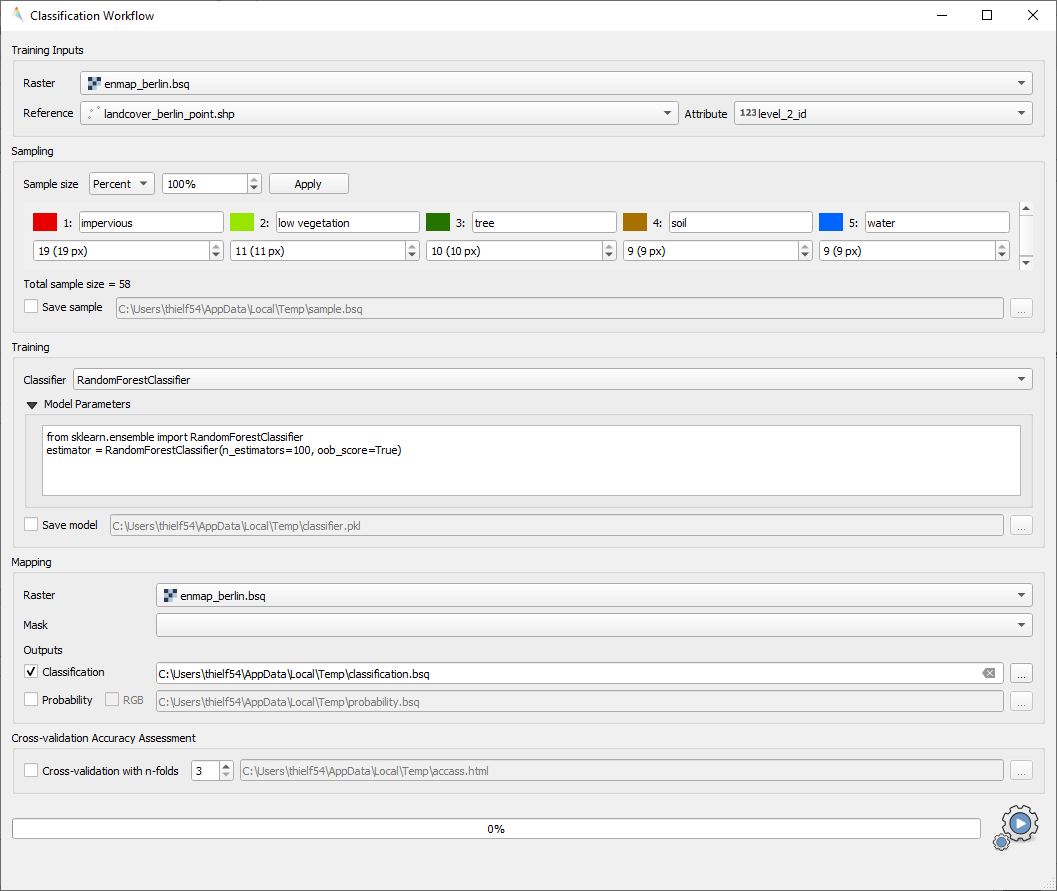
Classification Workflow Application
See also
Have a look at the Getting Started for a use case example of the Classification Workflow Application.
Input Parameters:
Training Inputs
Type

Three different types of input data sources are supported and have to be specified beforehand in the dropdown menu. Depending on the selected input type the user interface shows different options.
Raster / Classification:- Raster: Specify input raster based on which samples will be drawn for training a classifier.
- Classification: Specify input raster which holds class information.
Raster / Vector Classification:- Raster: Specify input raster based on which samples will be drawn for training a classifier.
- Reference: Specify vector dataset with reference information. Has to have a column in the attribute table with a
unique class identifier (numeric). The class colors and labels are derived from the current Symbology. To set or
change those settings, click the
 button or go to the Layer Properties ().
The vector dataset is rasterized/burned on-the-fly onto the grid of the input raster in order to extract the sample.
If the vector source is a polygon dataset, only polygons which cover more than 75% of a pixel in the target grid are rasterized.
button or go to the Layer Properties ().
The vector dataset is rasterized/burned on-the-fly onto the grid of the input raster in order to extract the sample.
If the vector source is a polygon dataset, only polygons which cover more than 75% of a pixel in the target grid are rasterized.
labelled Library:- Library: Specify input spectral library.
Sampling
Once you specified all inputs in the Training inputs section, you can edit the class colors, names and class sample sizes in the Sampling submenu.
Note
If set, the class labels and color information is automatically retrieved from the layers current renderer settings ().
- Sample size
 Specify the sample size per class, either relative in percent or in absolute pixel counts.
 - The total sample size is shown below
 Save sample: Activate this option and specify an output path to save the sample as a raster.
- Sample size
Training
In the Classifier
dropdown menu you can choose different classifiers (e.g. Random Forest, Support Vector Machine) Model parameters: Specify the parameters of the selected classifier.
Hint
Scikit-learn python syntax is used here, which means you can specify model parameters accordingly. Have a look at the scikit-learn documentation on the individual parameters, e.g. for the RandomForestClassifier
- Save model: Activate this option to save the model file (
.pkl) to disk.
Mapping
Raster: Specify the raster you would like to apply the trained classifier to (usually -but not necessarily- this is the same as used for training)
Mask: Specify a mask layer if you want to exclude certain areas from the prediction.
Outputs:
Classification: Output path where to write the classification image to.
Probability: Output path of the class probability image.
Hint
This outputs the result of a classifiers
predict_probamethod. Note that depending on the classifier this option might not be available or has to be activated in the model parameters (e.g. for the Support Vector Machine, the linesvc = SVC(probability=False)has to be altered tosvc = SVC(probability=True)RGB: Generates a RGB visualisation based on the weighted sum of class colors and class probabilities.
Cross-validation Accuracy Assessment
- Cross-validation with n-folds : Activate this setting to assess the accuracy of the classification by performing cross
validation. Specify the desired number of folds (default: 3). HTML report will be generated at the specified output path.
Run the classification workflow
Once all parameters are entered, press the  button to start the classification workflow.
EO Time Series Viewer
Please visit EO Time Series Viewer Documentation for more information.
EnPT (EnMAP Processing Tool)
Please visit `EnPT Tutorial<https://enmap.git-pages.gfz-potsdam.de/GFZ_Tools_EnMAP_BOX/EnPT/doc/tutorial.html>`_ for more information.
GFZ EnGeoMAP
todo
Image Math (deprecated)
todo
Regression Dataset Manager
todo
Regression Workflow (deprecated)
See also
Have a look at the Biomass Mapping Tutorial for a use case example of the Regression Workflow Application.
Input Parameters:
Training Inputs
- Raster: Specify input raster based on which samples will be drawn for training a regressor.
- Reference: Specify vector or raster dataset with reference information (regression target). In case of vector input, dataset has to have a numeric column in the attribute table with a target variable of interest. This vector dataset is rasterized/burned on-the-fly onto the grid of the input raster in order to extract the sample. If the vector source is a polygon dataset, all pixels will be drawn which intersect the polygon.
- Attribute: Attribute field in the reference vector layer which contains the regression target variable.
Sampling
Number of Strata
: Specify the desired number of strata sampling. If you don’t want to use
stratified sampling, just enter 1.Min & Max: Defines the value range in which samples should be drawn.
Sample size
: Specify the sample size per stratum, either relative in percent or in absolute pixel counts.Every stratum is listed below with the value range that is covered by this stratum depicted in square brackets (e.g.,
Stratum 1: [1.0, 4.33]). Furthermore, you can see and alter the number of pixels/samples for each stratum using the spinboxes.- Save sample: Activate this option and specify an output path to save the sample as a raster.
Training
In the Regressor
dropdown menu you can choose different regressors (e.g. Random Forest, Support Vector Regression, Kernel Ridge Regression)- Model parameters: Specify the parameters of the selected regressor.
Hint
Scikit-learn python syntax is used here, which means you can specify model parameters accordingly. Have a look at the scikit-learn documentation on the individual parameters, e.g. for the RandomForestRegressor
- Save model: Activate this option to save the model file (
.pkl) to disk.
Mapping
- Input Raster: Specify the raster you would like to apply the trained regressor to (usually -but not necessarily- this is the same as used for training)
Cross-validation Accuracy Assessment
- Cross-validation with n-folds : Activate this setting to assess the accuracy of the regression by performing cross
validation. Specify the desired number of folds (default: 3). HTML report will be generated at the specified output path.
Run the regression workflow
Once all parameters are entered, press the button to start the regression workflow.
Spectral Index Creator
todo