Last Update: 2025-06-19
Installation
Overview
If you like to develop an EnMAP-Box application, or more general, a QGIS and Qt application, we recommend to use a state-of-the-art Integrated Development Environment (IDE) like PyCharm. It offers run-time debugging, code completion, spell-checking, syntax highlighting, SCM support, unit-testing and many other helpful things.
1. Have Git Installed
If not, download and install Git from https://git-scm.com/downloads
Check if git is installed to your local shell, e.g. as:
C:\Windows\System32>git --version
git version 2.26.0.windows.1
under construction…
under construction…
2. Clone the EnMAP-Box Repository
Clone the EnMAP-Box repository (or a fork) to your local my_repositories folder and update
its submodules by:
cd my_repositories
git clone --recurse-submodules git@github.com:EnMAP-Box/enmap-box.git
cd enmap-box
git config --local include.path ../.gitconfig
The last line ensures that pull requests will update submodules as well.
Now you can use git pull to update your local copy of the EnMAP-Box repository:
cd my_repositories/enmap-box
git pull
Tip
Replace the repo url with that of your EnMAP-Box repo fork, if you like to provide code via pull requests.
under construction…
under construction…
3. Setup the QGIS Environment
This section gives examples how you can setup a QGIS & EnMAP-Box development environment, e.g. to be used by PyCharm.
Install or update packages
Install QGIS using the OSGeo4W Network installer https://qgis.org/en/site/forusers/download.html
Install the OSGeo4W environment to a folder of choice (preferably one you have permanent writing access to). In following this is called OSGeo4W.
Start the OSGeo4W Setup.
- Go forward to these steps by clicking next. Usually the default settings should be fine
‘Advanced Install’
‘Install from Internet’
‘Root Directory’ (should be your OSGEO4W directory)
Select Local Package Directory (default)
Select Your Internet Connect (default Direct Connection)
Choose A Download Site (default https://download.osgeo.org )
Select Packages to install / update
Package
Note
qgis
recent official QGIS version
python3-scikit-learn
Press Next to install packages / updates
Setup development environment
Copy the qgis-env.bat and start_pycharm.bat from https://github.com/EnMAP-Box/enmap-box/tree/main/.env/osgeo4w to a local folder, e.g. your windows desktop
Modify the qgis-env.bat config section to fit to your local environment, i.e. set the correct paths to your local OSGeoW installation and PyCharm executable
@echo off

:: ### CONFIG SECTION ###
:: root of local OSGEO4W installation
set OSGEO4W_ROOT=D:\OSGeo4W
:: PyCharm executable, adjust for version updates
set PYCHARM_EXE="C:\Program Files (x86)\JetBrains\PyCharm 2022.1.2\bin\pycharm64.exe"

:: git binaries and git lfs binaries
set BIN_GIT=C:\Program Files\Git\bin
set BIN_LFS=C:\Program Files\Git LFS
Call start_pycharm.bat to open PyCharm within the latest QGIS release. You can modify the start script to start a different QGIS build. E.g.
call "%~dp0\qgis-env.bat" qgis-ltr
start "PYCHARM" /B %PYCHARM_EXE%
will start the QGIS Long Term Release (if installed) instead of the latest QGIS release (qgis).
Possible QGIS versions provided by the OSGeo4W installer are:
Build
Description
qgis
QGIS Desktop (latest release)
qgis-ltr
QGIS Desktop (long term release)
qgis-dev
QGIS nightly build of the development branch
qgis-rel-dev
QGIS nightly build of the latest release branch
Due to the much simpler installation and maintenance, we recommend to install QGIS for Linux and macOS using conda.
The installation of QGIS within conda is (almost) the same on macOS, Windows or Linux. Using conda it is often much easier to install additional python packages, and admin rights are not required.
Make sure conda is installed on your system. We recommend to use the miniforge installer, which defaults to packages from the conda-forge channel.
Install QGIS and python dependencies, using one of the conda environment files (enmapbox_*.yml) from https://github.com/EnMAP-Box/enmap-box/tree/main/.env/conda, e.g.
conda env create -n enmapbox --file=https://raw.githubusercontent.com/EnMAP-Box/enmap-box/refs/heads/main/.env/conda/enmapbox_full.yml
--file=<uri>specifies the path to the *.yml file that defines the environment.-n <name>or--name <nam>can be used to change the environment name.The environment files provided for download vary by used QGIS release and python packages to be:
full environments contains all python packages, including those used by single EnMAP-Box applications only
light environments contain python packages that are required to run most and all core EnMAP-Box applications
ltr environments use the current QGIS Long Term release instead of the latest (and newer) QGIS release that is available in conda.
Use the raw content url to download and install an EnMAP-Box conda environment from github.
Environment
Size
Path
enmapbox_light
4.58 GB
https://raw.githubusercontent.com/EnMAP-Box/enmap-box/refs/heads/main/.env/conda/enmapbox_light.yml
enmapbox_light_ltr
4.65 GB
enmapbox_full
6.46 GB
https://raw.githubusercontent.com/EnMAP-Box/enmap-box/refs/heads/main/.env/conda/enmapbox_full.yml
enmapbox_full_ltr
6.90 GB
Activate the new environment:
conda activate enmapbox
Now you can start |QGIS`|, the :ref:`Qt Designer <dev_additional_tools> and Qt Assistant from your conda shell:
qgis
designer
assistant
To easily start applications in this environment that have not been installed by conda, you might define aliases during the activation of the environment, e.g. to start PyCharm
Create an activation script and define an alias for PyCharm:
Windows: <your conda installation>/envs/enmapbox/etc/conda/activate.d/pycharm-activate.bat
@echo off
doskey pycharm="<path to pycharm executable>"
MacOS: <your conda installation>/envs/enmapbox/etc.conda/activate.d/pycharm-activate.sh
alias pycharm='open -a PyCharm\ CE.app'
For completeness, also create a deactivation script:
Windows: <your conda installation>/envs/enmapbox/etc/conda/deactivate.d/others-deactivate.bat
@echo off
doskey pycharm=
MacOS/Linux: <your conda installation>/envs/enmapbox/etc.conda/deactivate.d/pycharm-deactivate.sh
alias pycharm=
Todo
Describe installation using docker image
4. Setup the IDE
Start PyCharm and add my_repositories/enmap-box as new project via File > Open File or Project
If this is not already the case, tell PyCharm where to find your Git-executable. Open File > Settings > Version Control > Git to set Path to Git executable. Press Test to check the used Git version.
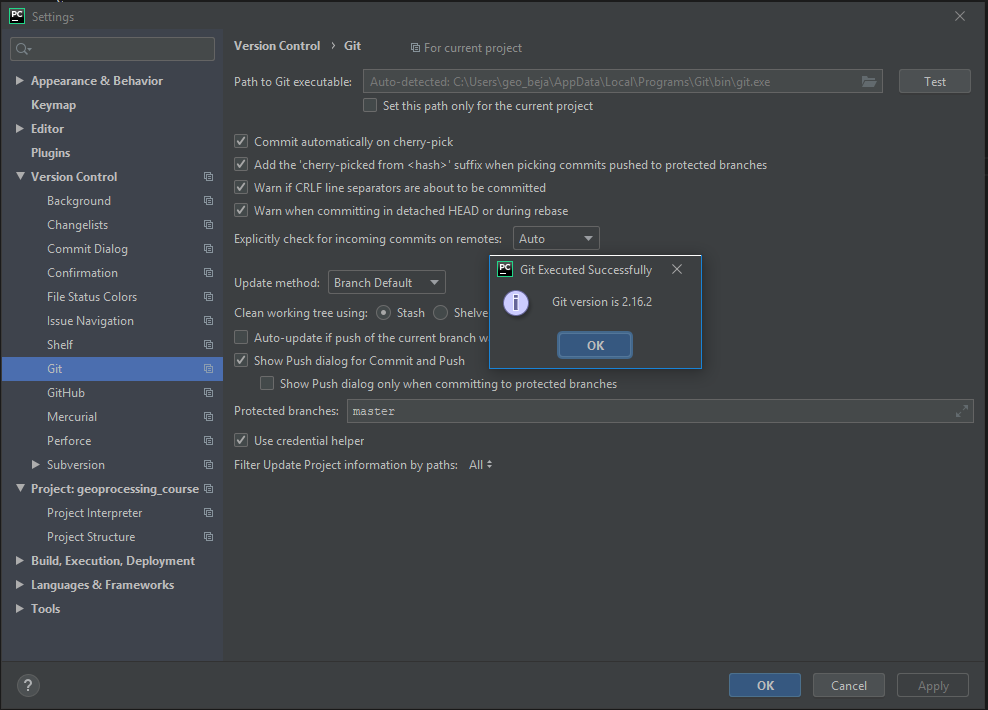
Fig. 34 Set the Git executable used by PyCharm
Tip
Use
whereto return the path of a git-executable that is available in your DOS/Linux/macOS shell(enmapbox) C:\>where git C:\Users\my_username\AppData\Local\Programs\Git\cmd\git.exe
Switch to Project: enmap-box > Project Interpreter and select the QGIS python as python interpreter.
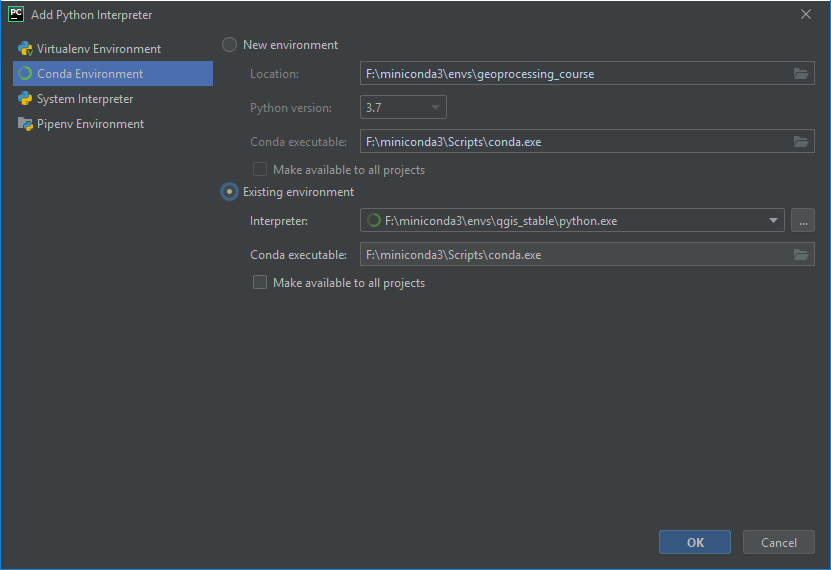
Fig. 35 Add the enmapbox python to the list of python interpreters
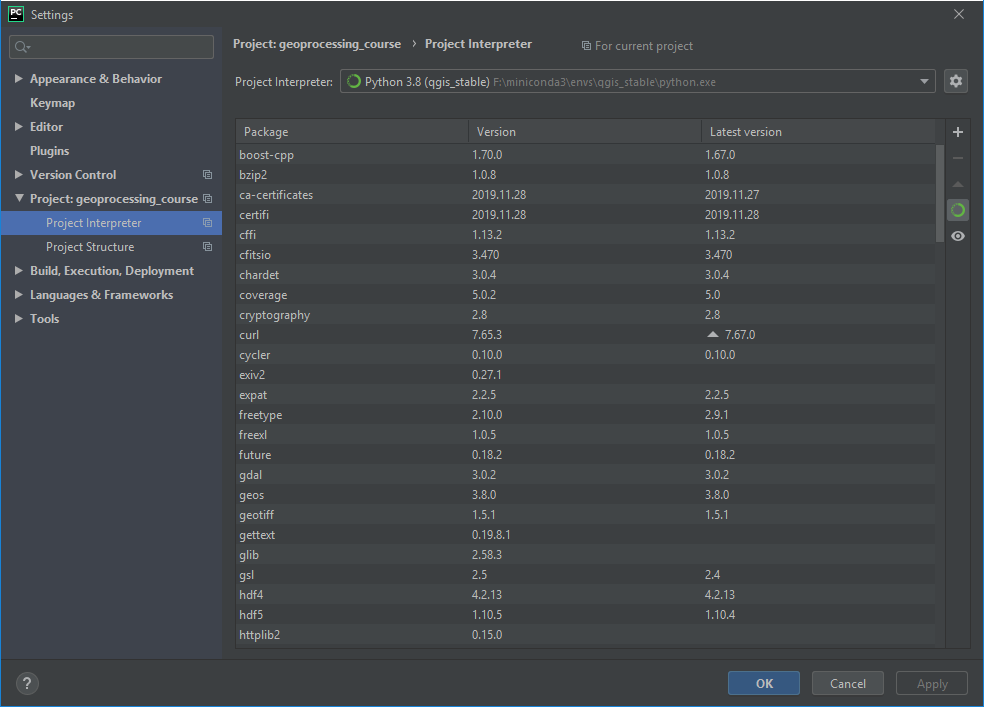
Fig. 36 Select the enmapbox python as project interpreter
Switch to Project Structure and add the QGIS python folder as additional project content root.
OSGeo4W
<your OSGeo4W folder>\bin\pythonLinux
/usr/bin/python3macOS
/Application/QGIS.app/Contents/MacOS/bin/python3conda (win)
<conda root>/envs/enmapbox/Library/pythonconda (linux)
<conda root>/envs/enmapbox/share/qgis/pythonconda (macOS)
<conda root>/envs/enmapbox/QGIS.app/Contents/MacOS/../Resources/pythonRight-click on the
pluginssubfolder and select Sources. This makes QGIS internal plugins like the “processing” plugin available to PyCharm.Now the PyQGIS API is available to your Python installation.
Tip
The same way allows you to include other directories to your project’s PYTHONPATH, e.g. to make code available from other folder or repositories.
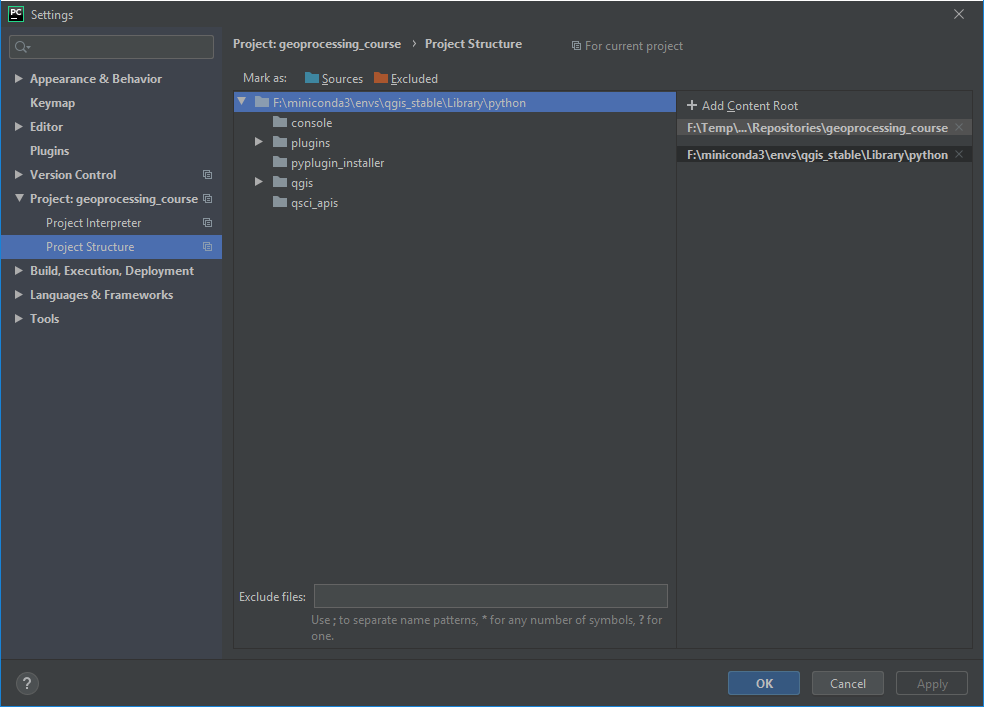
Fig. 37 Use
enmap/Library/pythonas additional content root
PyCharm and PyQGIS may need the environmental variable
QGIS_PREFIX_PATH. Typical paths are:QGIS Installation
QGIS_PREFIX_PATH
OSGeo4W
<OSGeo4W>/apps/qgis
Linux
conda (Windows)
<conda installation>\envs\enmap\Library
conda (Linux)
<conda installation>/envs/enmapbox
conda (macOS)
<conda installation>/envs/enmapbox/QGIS.app/Contents/Resources
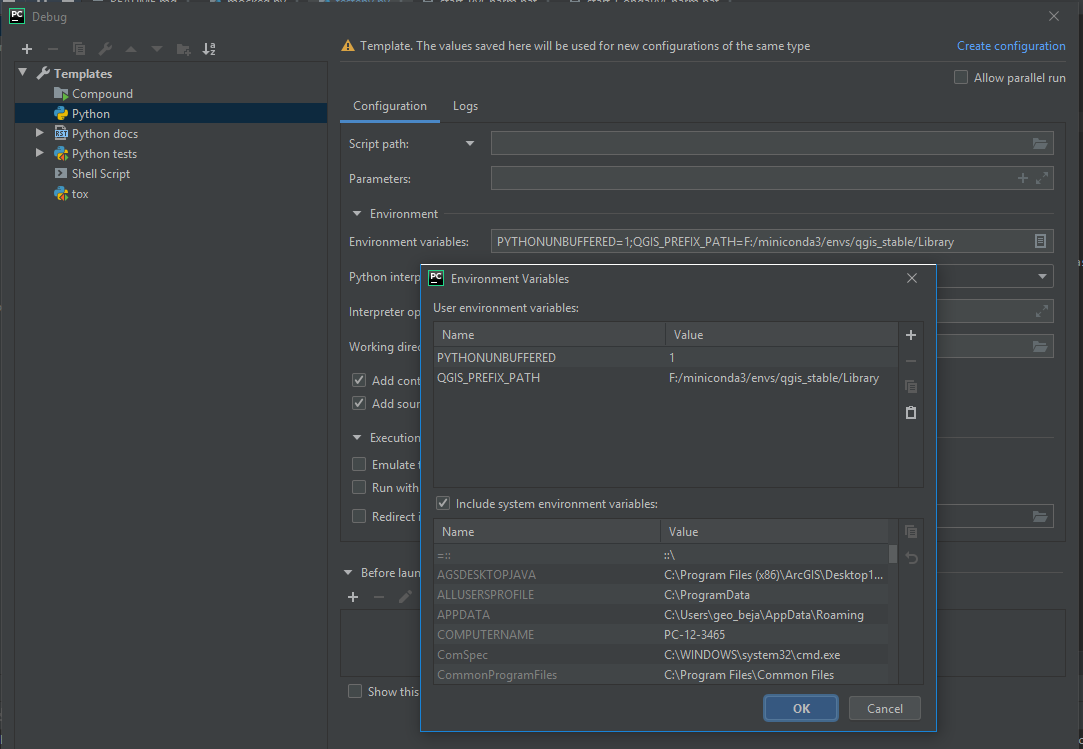
If not already set in the environment from which you started PyCharm, you can set it explicitly. Open Run > Debug … > Edit Configurations and add the QGIS_PREFIX_PATH to the User environmental variables. This way PyCharm runs python files in a environment with QGIS_PREFIX_PATH defined.
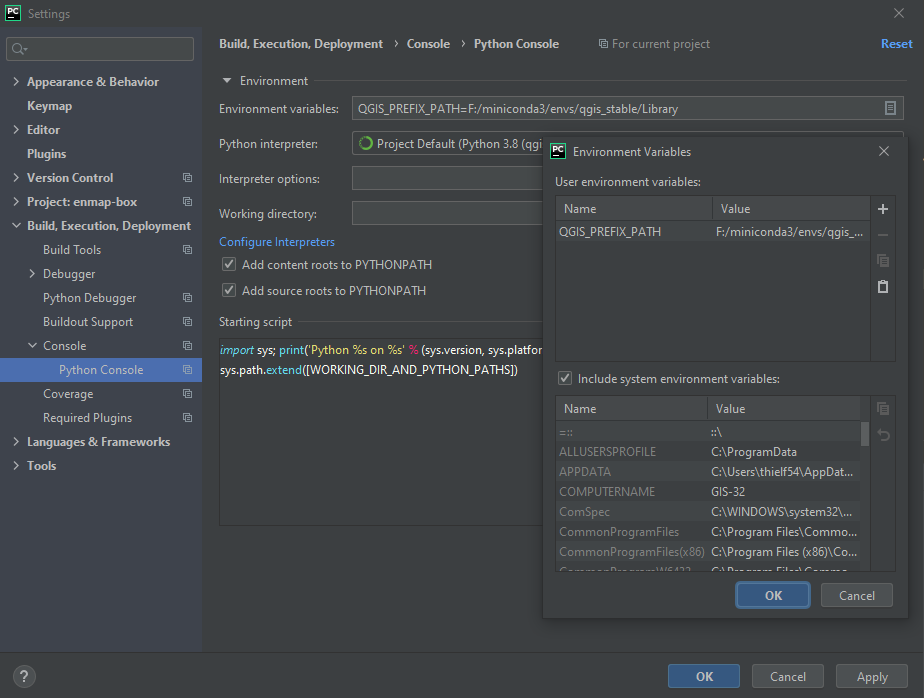
Also define the Environment variables for the Python console. Go to File > Settings > Build, Execution, Deployment > Console > Python Console and add QGIS_PREFIX_PATH to the Environment variables.
You may also modify the shell used in your PyCharm terminal to use the QGIS environment. Open Tools > Terminal and set the shell path to, for example:
QGIS Installation
Terminal path
OSGeo4W
cmd.exe "/K" qgis_env.bat(see above how to create theqgis_env.bat)conda (Windows)
cmd.exe "/K" <conda installation>\Scripts\activate.bat enmapbox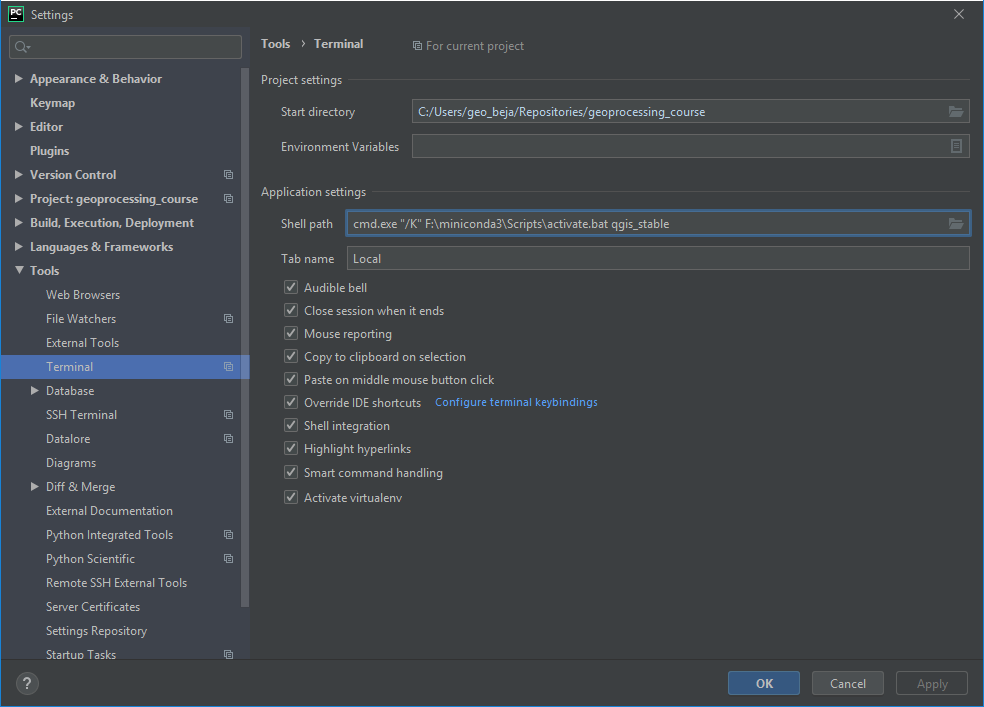
Fig. 38 How to use the conda terminal in PyCharm
Test the Python environment
To check if the QGIS API is available, open a Python Console and import the
QgsApplicationobject.from qgis.core import QgsApplication QgsApplication.instance() is None
The output should return
True, as we have not initialized any QgsApplication.Now check if we can use the EnMAP-Box API to start the EnMAP-Box
import enmapbox
enmapbox.run()
This should initialize a new QgsApplication and start the EnMAP-Box. The outputs printed to the python shell should look like:
Application state:
QGIS_PREFIX_PATH env var:               D:\miniconda3\envs\enmapbox\Library
Prefix:         D:\miniconda3\envs\enmap\Library
Plugin Path:            D:\miniconda3\envs\enmapbox\Library/plugins
Package Data Path:      D:\miniconda3\envs\enmapbox\Library/.
Active Theme Name:
Active Theme Path:      D:\miniconda3\envs\enmapbox\Library/./resources/themes\\icons/
Default Theme Path:     :/images/themes/default/
SVG Search Paths:       D:\miniconda3\envs\enmapbox\Library/./svg/
        C:\Users\geo_beja\AppData\Local\Temp\QGIS-PythonTestConfigPathp1k7w_s_\profiles\default/svg/
User DB Path:   D:\miniconda3\envs\enmapbox\Library/./resources/qgis.db
Auth DB Path:   C:\Users\geo_beja\AppData\Local\Temp\QGIS-PythonTestConfigPathp1k7w_s_\profiles\default/qgis-auth.db
If the terminal environment was setup well, you can start the EnMAP-Box from the Terminal window as well by
(enmapbox) ..\enmap-box>python enmapbox
Additional Tools
The Qt company provides various tools that help to create Qt applications. They are useful for PyQt and PyQGIS users as well.
The Qt Assistant allows to discover and read *.qch files, which are provided for the Qt and QGIS APIs. Although written to document the C++ code, most descriptions apply 1:1 to the Python API.
The Qt Assistant browses *.qch files super fast and also offline, which is why it is often a better alternative to the slower Python online documentation. In addition, the *.qch docs link into the QGIS C++ source code, which makes it easier to understand the functionality of the QGIS API.
Download the
*.qch*files which contain:the Qt API documentation files: https://github.com/PierreRaybaut/PyQtdoc
the QGIS API documentation qgis.qch
Go to Preferences > Add and add the following
*.qchfilesFile
Documentation
qgis.qch
qgis.core, qgis.gui
qtcore.qch
Qt5.QtCore
qtgui.qch
Qt5.QtGui
qtwidgets.qch
Qt5.QtWidgets
D:OSGEO4WappsPython312Libsite-packagesPyQtdoc
Now you can explore the Qt (
Q...) and QGIS (Qgs...) classes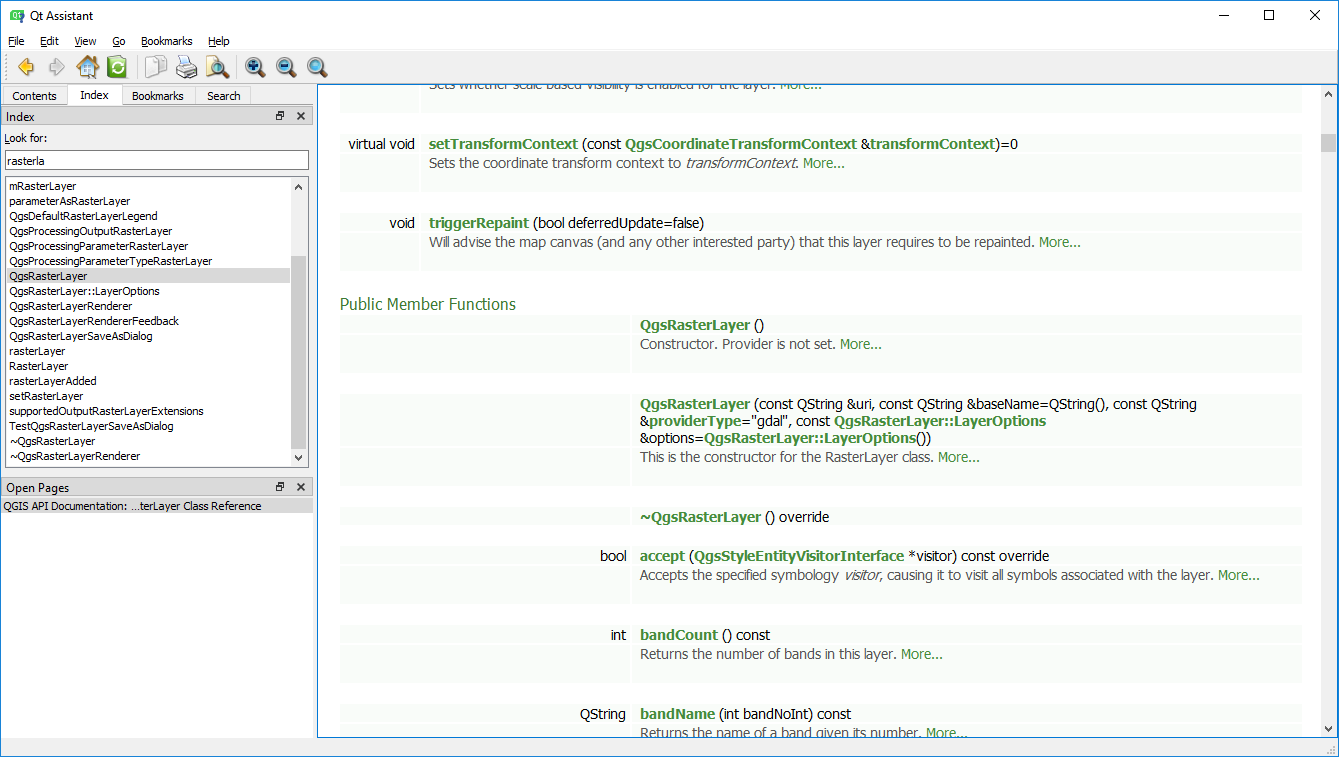
Start the Qt Assistant, e.g. from your PyCharm terminal:
(enmapbox) $>assistant
The following script can be used to regularly update the QGIS documentation:
curl --output <path_to>/qgis.qch --url https://api.qgis.org/api/qgis.qch
assistant -register <path_to>/qgis.qch -quiet
The Qt Designer is a powerful tool to create GUI frontends by drawing, drag and drop.
Created GUI form files are saved in a XML file ending with *.ui. These can be called from
python to automatically create the entire GUI backend, e.g. windows and buttons defined with the Qt Designer.
You can start the Qt Designer from your PyCharm terminal by:
(enmapbox) $>designer

Fig. 39 Qt Designer showing the metadataeditor.ui for the Metadata editor.
The Qt Creator is the one-in-all IDE to develop Qt C++ applications. It includes the functionality covered by Qt Assistant (here called Help) and Qt Designer (here called form designer) and helps to browse C++ code. It is the preferred tool to explore the QGIS C++ source code, for example if you like to better understand what it does behind the QGIS python API.
Qt and the Qt Creator are available at https://www.qt.io/download. Ensure to install the code documentation for the same Qt version used by QGIS.
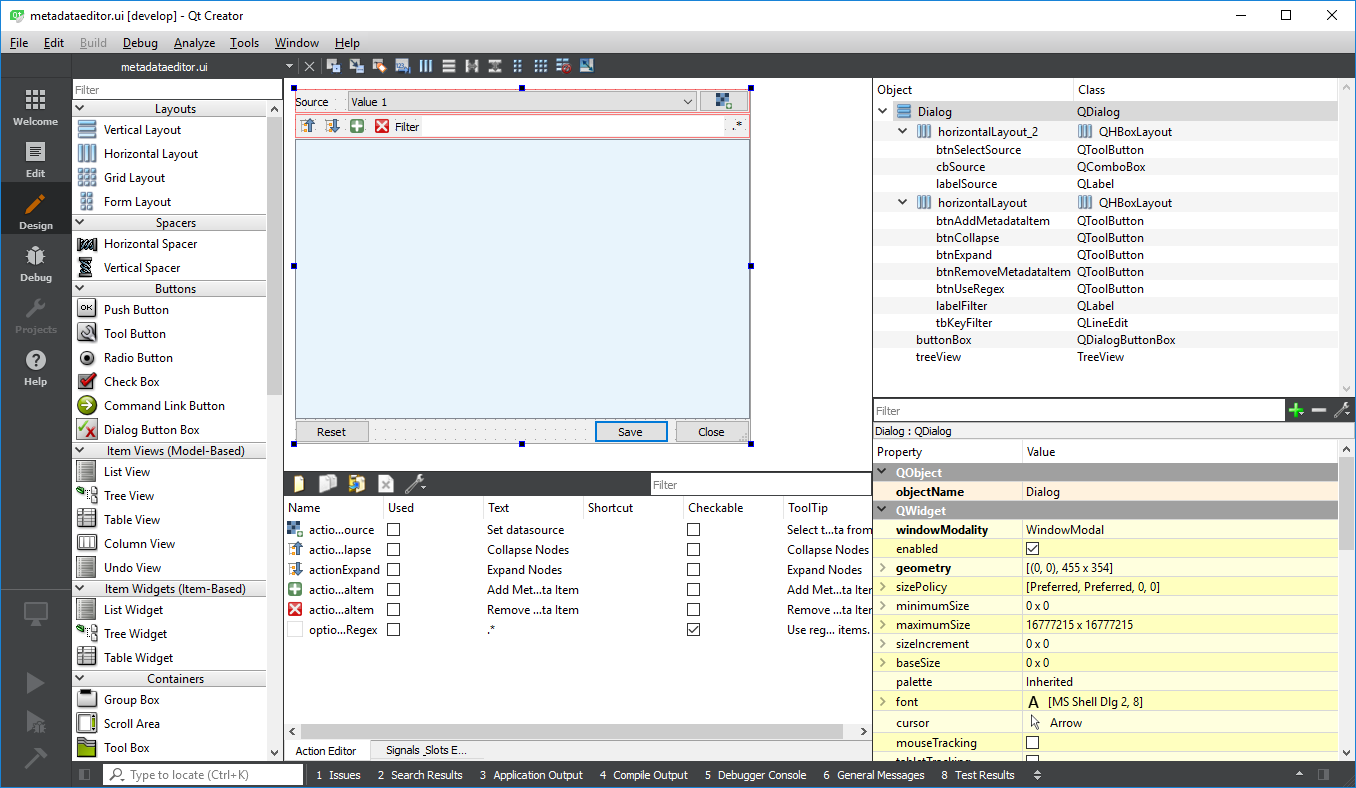
Fig. 40 Qt Creator with opened metadataeditor.ui.
OSGeo4W for Devs
The OSGeo4W installer for QGIS on windows allows you to install and maintain different QGIS versions in parallel.
Package |
Descriptions |
|---|---|
|
Latest QGIS release (LR) |
|
QGIS long term release (LTR) |
|
Nightly build of QGIS developer branch |
|
QGIS Desktop using Qt6 (QGIS 4.0) |
Setup Environment
Download the (new) OSGeo4W installer (osgeo4w-setup.exe from https://www.qgis.org/en/site/forusers/download.html )
Install the nightly build branch qgis-dev and related debug symbols qgis-dev-pdb.
Install other required packages, e.g. pip3 etc. Later on. In case of missing packages, search and install via OSGeo4W installer first. If not available there, use the OSGeo4W shell and call pip.
Create a qgis-dev-env.bat to setup your QGIS environment
set OSGEO4W_ROOT=D:\OSGeo4W
set QGISDISTR=qgis-dev
set DIR_GIT=C:\Program Files\Git\cmd
set DIR_LFS=C:\Program Files\Git LFS
:: add GIT and LFS to path

call "%OSGEO4W_ROOT%\bin\o4w_env.bat"
path %OSGEO4W_ROOT%\apps\%QGISDISTR%\bin;%DIR_GIT%;%DIR_LFS%;%PATH%

set QGIS_PREFIX_PATH=%OSGEO4W_ROOT:\=/%/apps/%QGISDISTR%
set GDAL_FILENAME_IS_UTF8=YES
rem Set VSI cache to be used as buffer, see #6448
set VSI_CACHE=TRUE
set VSI_CACHE_SIZE=1000000
set QT_PLUGIN_PATH=%OSGEO4W_ROOT%\apps\%QGISDISTR%\qtplugins;%OSGEO4W_ROOT%\apps\qt5\plugins
set PYTHONPATH=%OSGEO4W_ROOT%\apps\%QGISDISTR%\python;%OSGEO4W_ROOT%\apps\%QGISDISTR%\python\plugins;%PYTHONPATH%
Don’t forget to make git and git-lfs available in this environment.
Create a qgis-dev-pycharm.bat in the same folder as qgis-dev.bat that starts PyCharm
call "%~dp0\QGIS-dev.bat"
set PYCHARM_EXE="C:\Program Files (x86)\JetBrains\PyCharm 2020.3.4\bin\pycharm64.exe"

start "PYCHARM" /B %PYCHARM_EXE%

:: uncomment to start QGIS
:: start "QGIS" /B "%OSGEO4W_ROOT%\bin%QGISDISTR%-bin.exe" %*
Call qgis-dev-pycharm.bat to start PyCharm and set your project settings to:
Project Interpreter: <OSGEO4W>binpython.exe
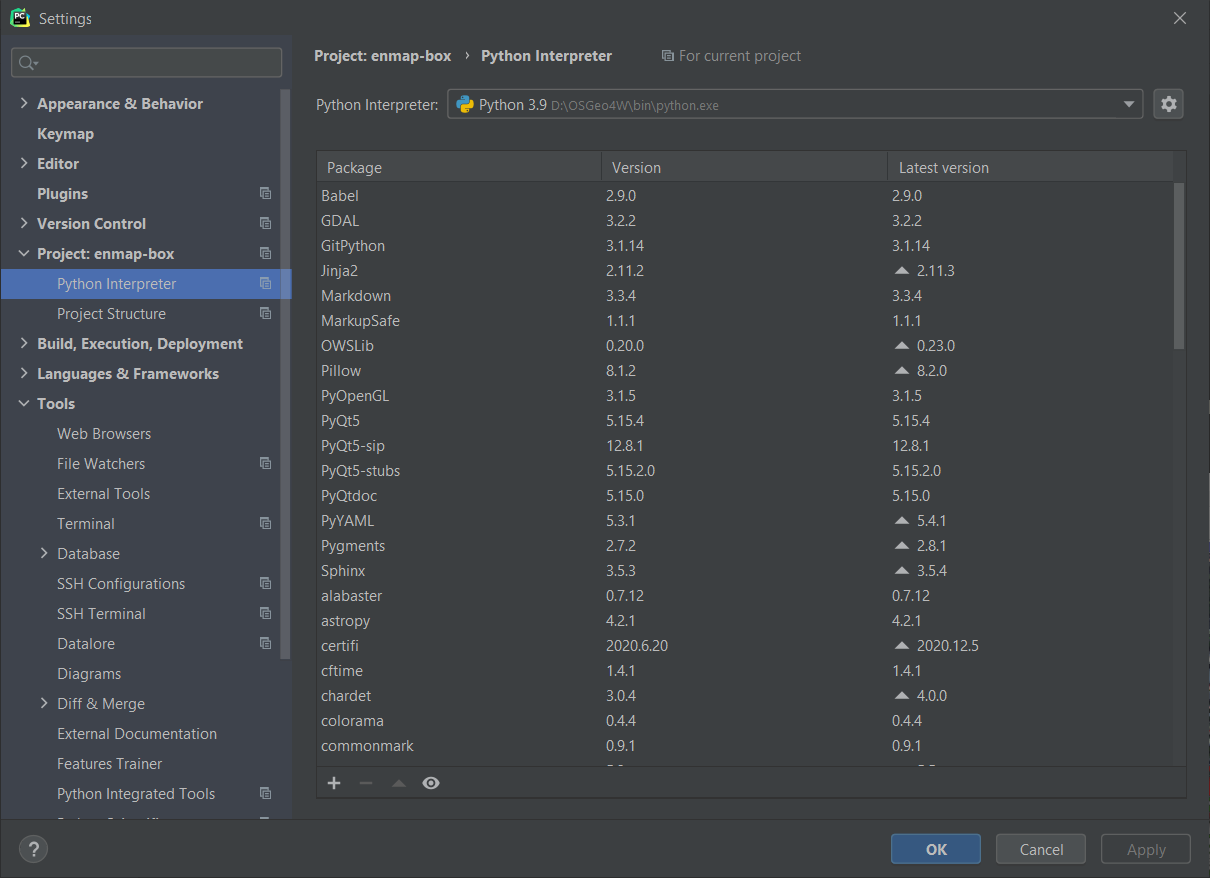
Fig. 41 Using the OSGeo4W python as project interpreter.
Terminal Shell Path: cmd.exe “/K” <your path to>qgis-dev.bat (this is why we created two batch files. qgis-dev.bat setups the environment, but does not start any app)
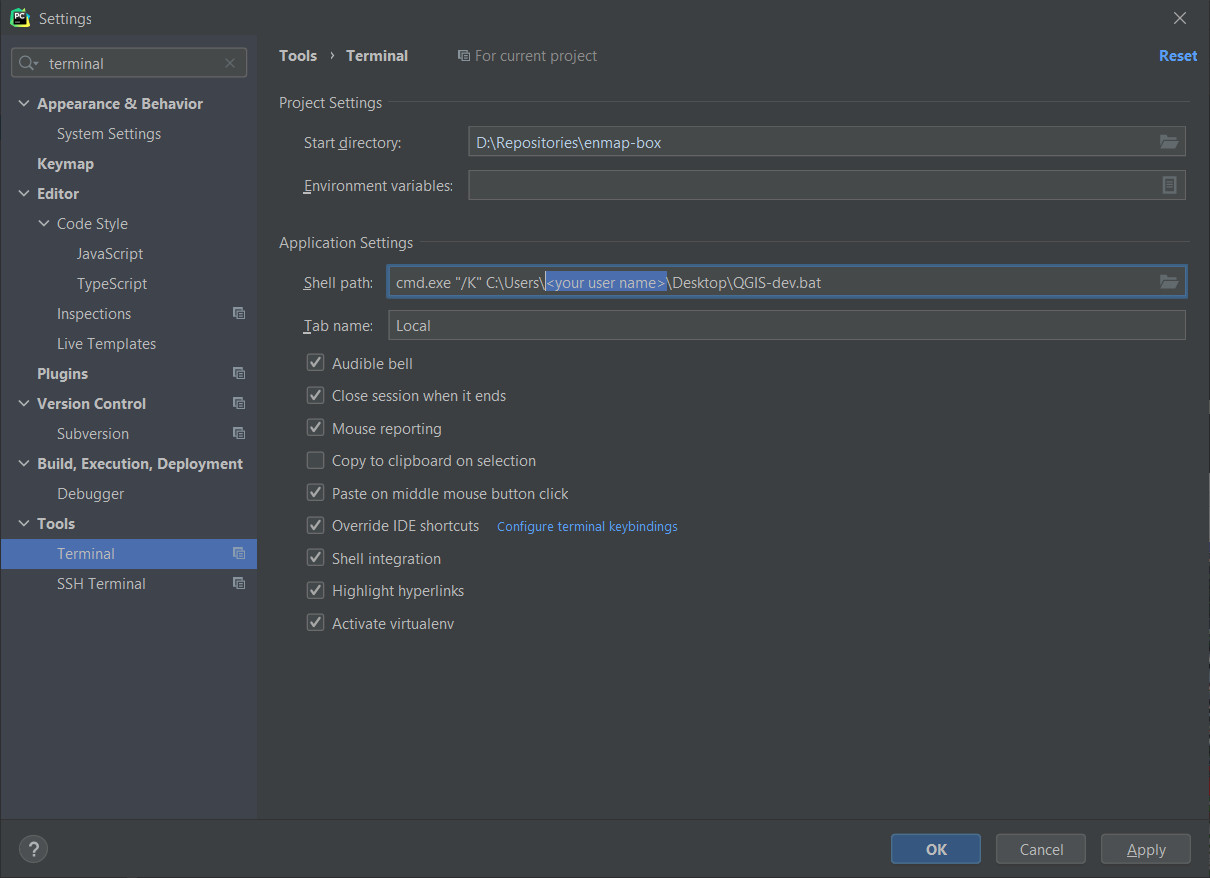
Fig. 42 The qgis-dev.bat will be called when starting the terminal
add <OSGEO4W>appsqgis-devpython and <OSGEO4W>appsqgis-devpythonplugins as source folders
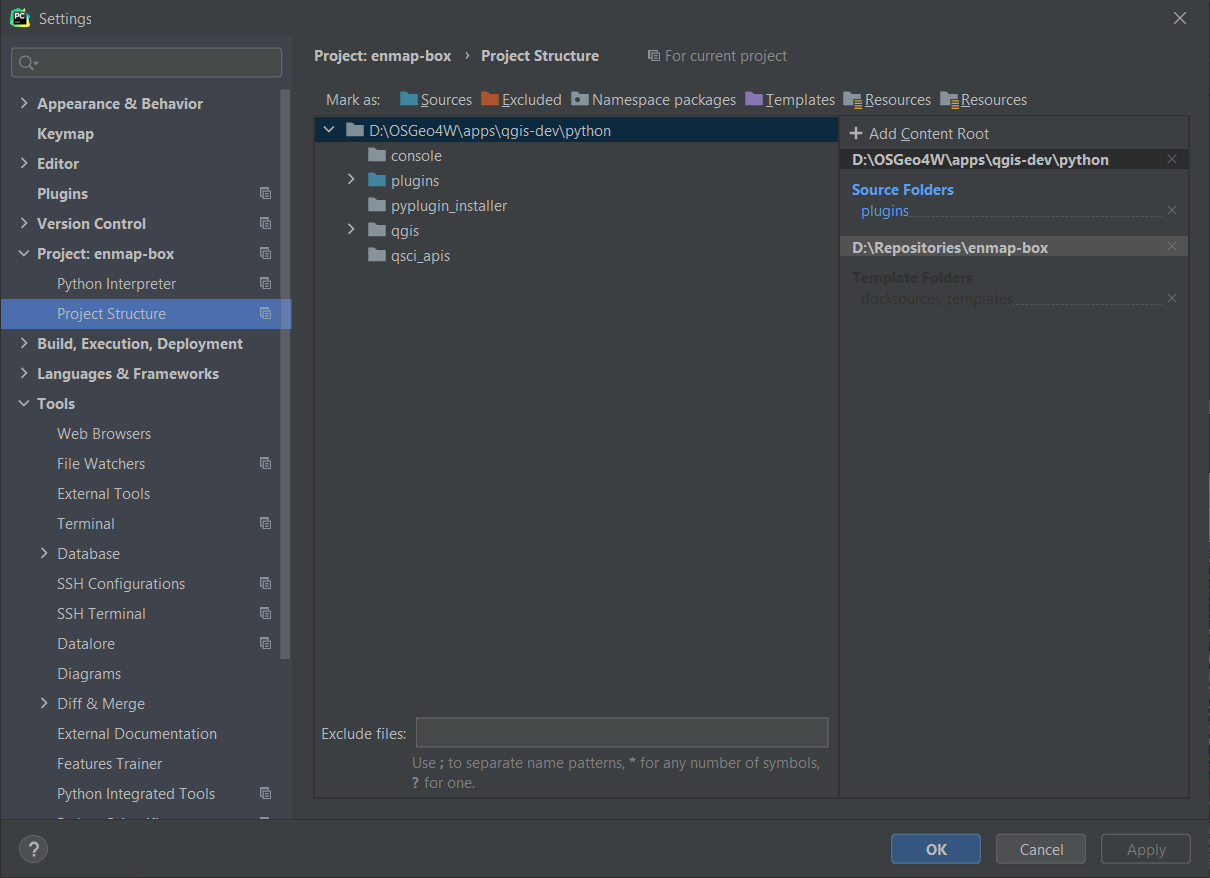
Fig. 43 Adding the QGIS python and pythonplugins folder as content roots.
Debug QGIS with Visual Studio
Clone the QGIS repo and checkout the latest master
Install Visual Studio and open the QGIS repo
Start a QGIS desktop, e.g. with qgis-dev from the OSGeo4W shell
Attach the Visual Studio debugger to a QGIS desktop instance
Open Debug > Attach to Process (CTRL+ALT+P)
Filter available processes by ‘QGIS’ and, e.g., select qgis-dev-bin.exe
Press the Attach button
References
Git -the simple guide (no deep shit) https://rogerdudler.github.io/git-guide/
Qt5 C++ API https://doc.qt.io/qt-5/
QGIS C++ API https://api.qgis.org/api/
QGIS Python https://qgis.org/pyqgis
QGIS Python developer cookbook https://docs.qgis.org/3.4/en/docs/pyqgis_developer_cookbook