8. Spectral Imaging Deep Learning Mapper (SpecDeepMap): A Tutorial for Semantic Segmentation
Author: Leon-Friedrich Thomas
Publication date: 09/06/2025
This tutorial gives an introduction of the Spectral Imaging Deep Learning Mapper (SpecDeepMap) application, which is designed for Semantic Segmentation of spectral imagery (spatial-spectral pixel classification).
With this application, users can train deep-learning architectures such as U-Net, SegFormer with a variety of encoder backbones e.g. ConvNext, Swin-Transformer and Segment Anything Model 2 (+ 800 encoders from Pytorch Image Models (timm) library).
Additionally,the pretrained ResNet-18 and ResNet-50 foundation model encoders, trained on Sentinel-2 Top of Atmosphere Reflectance imagery from SSL4EO-S1/2, are also available.
IMPORTANT: INSTALLATION of PYTHON DEPENDENCIES:
SpecDeepMap dependencies can be installed with one-line of code in miniforge + conda environment or in OSGeo4W Shell. Here short instruction (in installation chapter you find more details on how to use miniforge + conda and also on GPU installation – only available for miniforge setup).
Option 1: Create a complete python environment with Miniforge + conda:
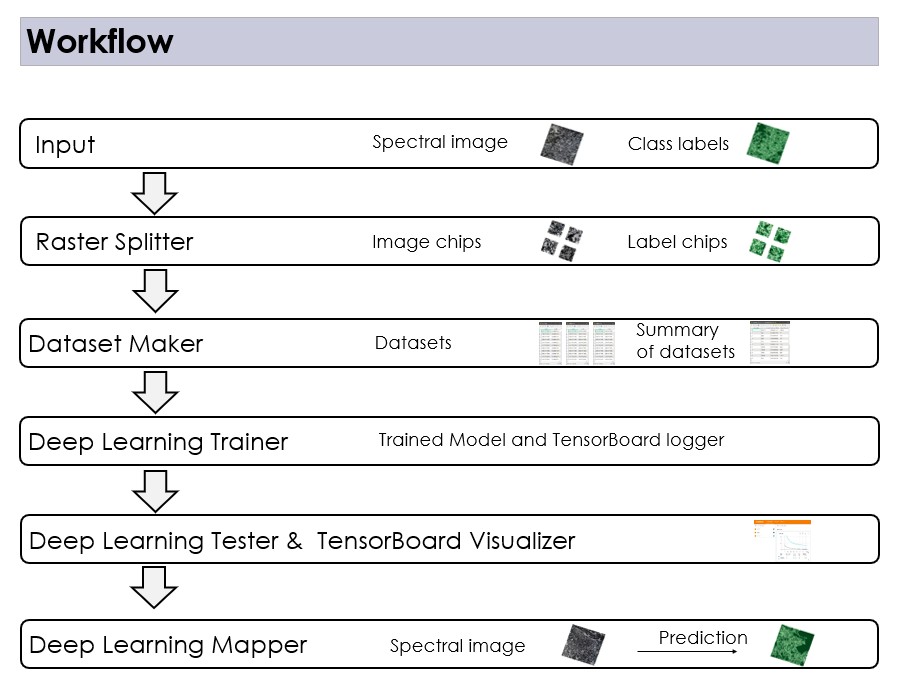
SpecDeepMap is designed for semantic segmentation (spatial-spectral pixel classification) of geospatial imagery. It consists of six algorithm each for a step of the workflow:
Chip Generation: Splits spectral rasters (e.g., orthomosaics, satellite tiles) and their corresponding pixel-labeled ground truth rasters into smaller, standardized chips.
Dataset Creation: Organize these chips into structured training, validation and test datasets
Model Training: Train a semantic segmentation model (e.g., U-Net, Segformer + 800 available timm encoders)
(Optional) Exploration of Model training: Inspect Model training with TensorBoard
Test Model: Evaluate model performance on test dataset
Map with Model: Apply the trained model directly on spectral rasters (e.g., orthomosaics, satellite tiles) to create classification raster
SpecDeepMap is available by default in EnMAP-Box from 3.16 onwards until further notice, and python dependencies have to be installed via Miniforge/Conda or OSGeo4W Shell.
8.2.1. Install QGIS & SpecDeepMap via Miniforge/Conda (cross-platform)
The following steps show you how to install and run the EnMAP-Box with SpecDeepMap Application from a conda python environment. This enables cross-platform setup and enables optionally GPU support. Conda is a cross-platform package manager that allows install software in separate environments.
It is strongly recommended to use Miniforge, a minimal installer for conda specific to the conda-forge channel (https://conda-forge.org/ ).
(If you nevertheless use miniconda instead of miniforge- make sure conda-forge channel is set to priority. Further SpecDeepMap is developed and tested via Miniforge, use of miniconda might lead to errors)
8.2.3. Timeless Recovery Environment with Explicit Python Package Versions of Original Release (CPU/GPU)
If SpecDeepMap encounters issues due to Python package updates or incompatibilities, you can restore a fully functional environment according to the original release environment using the provided configuration files. These define all required packages explicitly, ensuring that both CPU and GPU versions run reliably across platforms.
For cpu version run the following command in miniforge shell:
For GPU version with cuda 12.4 run the following command in miniforge shell. If you need newer cuda version you can also create just the cpu environment and run a force-reinstall with newer cuda version (see step 2. of cuda enable installation).
If you want to use a newer CUDA version or have trouble with the direct install, you can first create the CPU environment, then manually re-install PyTorch using the appropriate pip install command (as shown in Step 2: Install PyTorch with CUDA).
Activate environment using conda activate specdeepmap_cpu_time_capsul or conda activate specdeepmap_gpu_time_capsul
In this Tutorial we will fine-tune a pretrained Resnet18 backbone for Sentinel-2 Top of Atmosphere reflectance imagery with European Union Crop type Map (EUCROPMAP) labels for a semantic segmentation task. The pretrained Resnet18 for Sentinel-2 Top of Atmosphere reflectance originates from foundation model pretraining performed by Wang et al. 2022 on SSL4EO-S12 (https://arxiv.org/abs/2211.07044) and is loaded by torchgeo functions(Adam Stewart et al 2022 https://arxiv.org/abs/2111.08872 library: https://torchgeo.readthedocs.io/en/stable/tutorials/torchgeo.html).
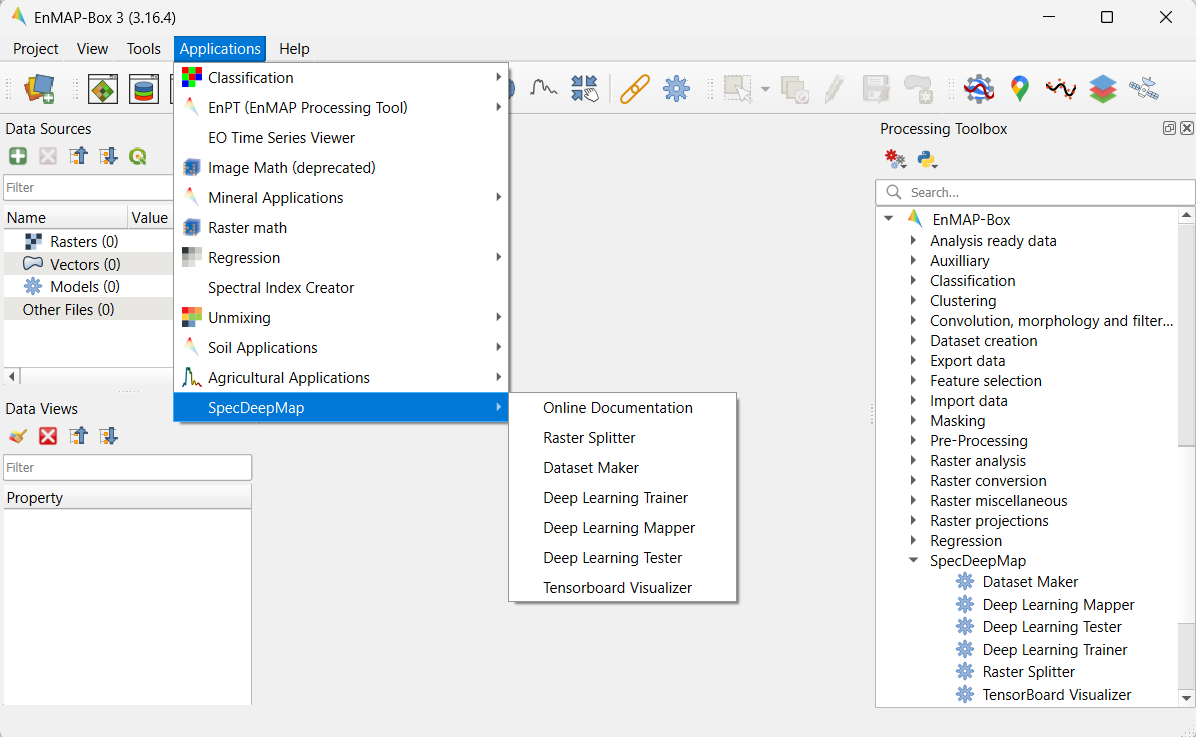
Launch QGIS and click the EnMAP-Box icon in the toolbar to open the EnMAP-Box. In the EnMAP-Box GUI you can find the SpecDeepMap application in the algorithms in Applications menu the EnMAP-Box Processing Algorithms
If Algorithms are displayed in grey in application menu the python dependencies are not installed.
Download either the tutorial_small or tutorial_large folder. Each folder contains same data for this tutorial just in different sizes, both come with a pretrained model. If you have fewer computational resource use the tutorial_small folder, otherwise use the tutorial_large one. Both datasets work the same way the only difference is the tutorial_large has a larger training data volume and larger raster image to apply the final prediction. As you can use the pretrained model, which is in both folders the evaluation performance won’t differ much.
The tutorial files are zipped, download either tutorial_small or tutorial_large. Create a new folder ‘specdeepmap_tutorial’ and unzip either of the datasets folders in that folder.
More info on datasets:
Both datasets were prepared and downloaded using the Google Earth Engine. For the Sentinel 2 TOA data, multiple cloud- free tiles from 23 June 2022 over Germany were mosaiced.For the same region of interest, the corresponding EUCROPMAP class labels from 2022 were downloaded. Both dataset were reprojected to spatially align. The EUCROPMAP class labels were resampled from 25 classes to 10 to ensure minimum class presence of 0.5 % per class in the dataset. Classes smaller than 0.5% were combined under ‘other classes’. Here the adapted numeric encoding per class: 0 = unclassifed ,1 = other classes (less then 0.5% in ROI),2 = Artificial ,3 = Common wheat,4 = Barley, 5 = Maize, 6 = Woodland and Shrubland (incl. permanent crops),7 = Grasslands,8 = Water, 9 = Rapeseed and turnip rapeseed, 10= Sugar beet. Original link to dataset: EUCROPMAP Lables here: https://developers.google.com/earth-engine/datasets/catalog/JRC_D5_EUCROPMAP_V1 and link to Sentinel-2 TOA dataset source: https://developers.google.com/earth-engine/datasets/catalog/COPERNICUS_S2_HARMONIZED .
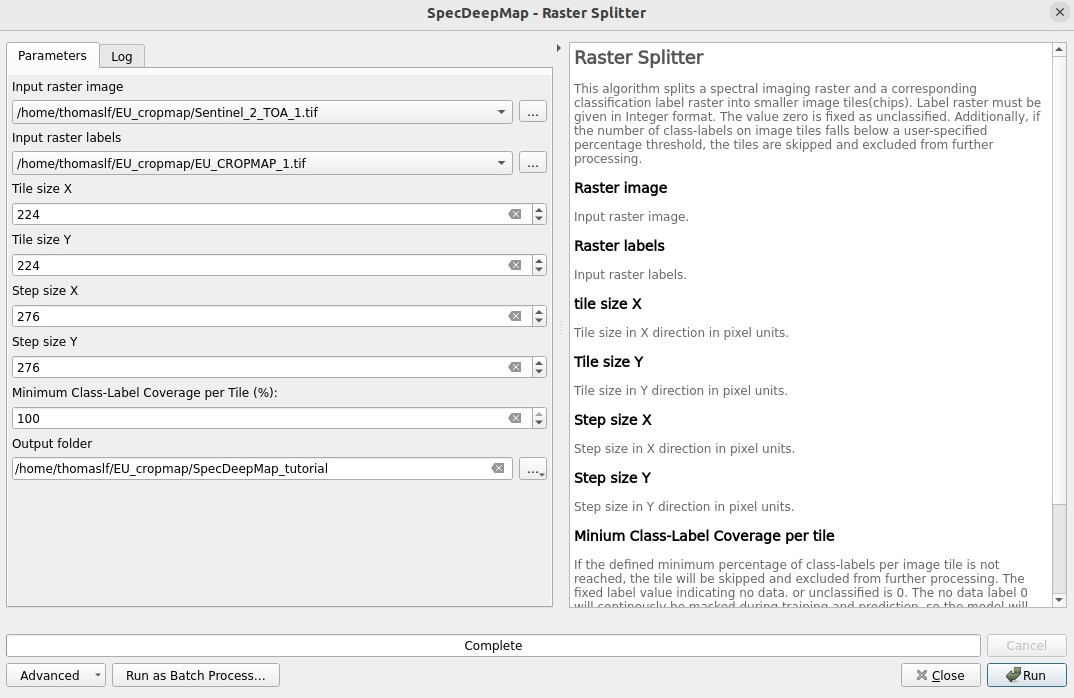
The Raster Splitter splits a spectral imagery raster and a corresponding label raster with the same size into smaller image and label chips.
Classification label raster should be expressed in any numeric values in range 0-255. The value 0 is reserved for unclassified or no-data.
The software user can define the chip size in X and y direction by the parameter tile size X and tile size Y. And also a step size X and step size Y.
In this example we split the Sentienl-2 TOA image and the EUCROPMAP labels into smaller chips.
Use the following inputs: Input raster image: Sentinel_2_TOA_1.tif and Input raster labels: EUCROPMAP_1.tif or their smaller counterparts ‘Sentinel_2_TOA_1_tiny.tif’ and ‘EUCROPMAP_1_tiny.tif’if you use the tutorial_small folder.
Set tile size X to 224 and tile size Y to 224 and step size X to 275 and step size Y to 275, to avoid spatial autocorrelation of the chips.
Set Minimum Class Label coverage per Tile (%) to 100. This parameter defines if we want only image chips with full label coverage or also partial covered label. In our case we use only fully covered labels chips so, set the parameter to 100.
As Output folder choose the created folder ‘specdeepmap_tutorial’ or if not previsouly created create an folder ‘specdeepmap_tutorial’, chose the folder for the raster splitter output.
Run the algorithm with the given parameters this results in ~2300 image and label chips for the tutorial_large dataset (or ~120, when using the tutorial_small dataset). These are now stored in the sub folders ‘images’ and ‘labels’ in the created folder ‘specdeepmap_tutorial’.
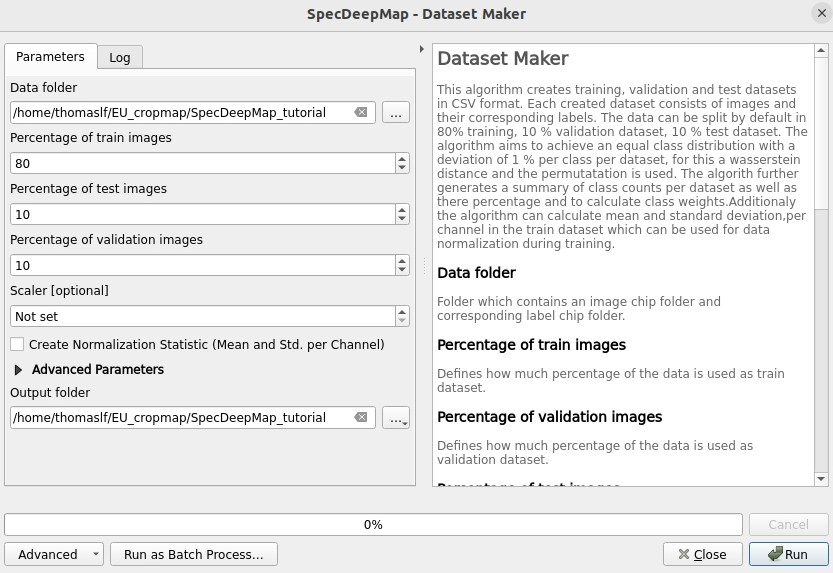
The Dataset Maker takes the created folder as Input and generates a training, validation and test datasets with similar class distributions in form of CSV files with stored relative file paths to the image chips.
As well as a summary CSV file which show class distribution per dataset as well as suitable class weights for balanced training.
As Data folder use the previously created ‘specdeepmap_tutorial’ folder.
A default dataset split Percentages of train images is 80 and Percentages of test images is 10 and Percentages of validation images is 10. We will run the algorithm with this default setting.
As Output folder use the previously created ‘specdeepmap_tutorial’ folder.
Run the algorithm with the default split percentages of train images 80%, percentage of test image 10%, percentage of validation images 10%.
(After the algorithm run it displays all created CSV files in a window. If you feel like inspecting one you can click on it and it will be added to the file menus. Otherwise you can just close the window).
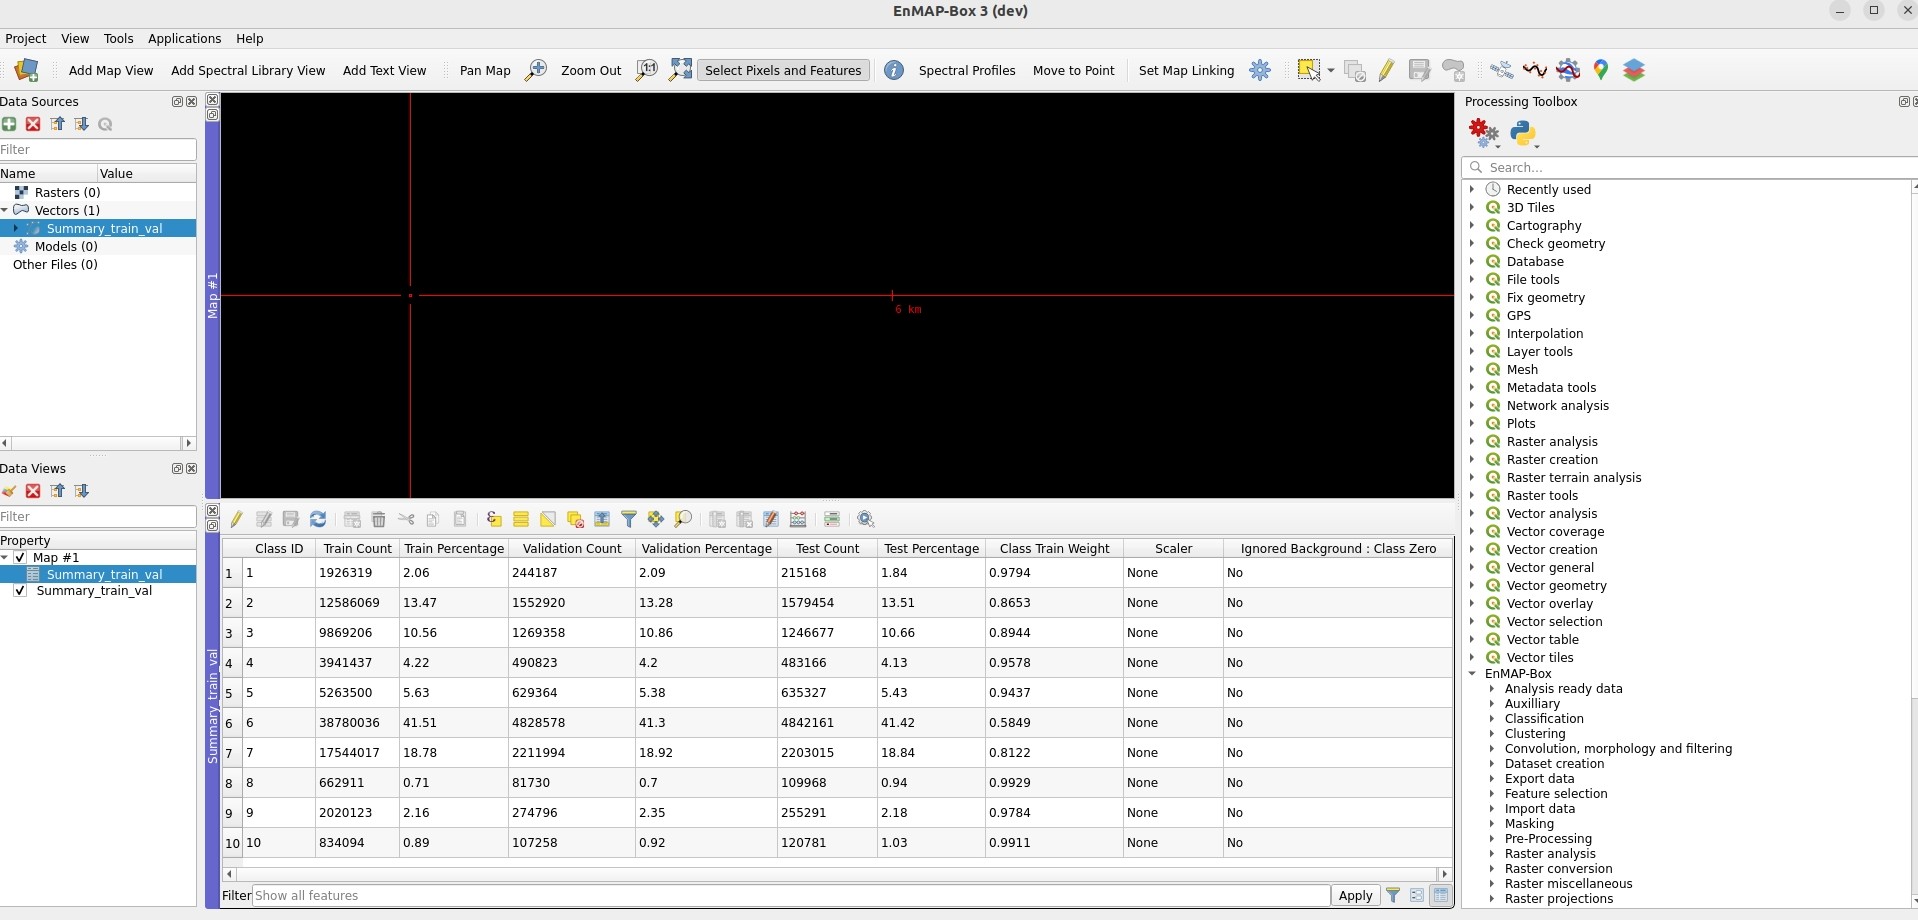
Optionally if you want to later inspect a csv file e.g. the summary table in the enmapbox and load the ‘Summary_train_val.csv’ located in the ‘specdeepmap_tutorial’ folder and open the attribute table.
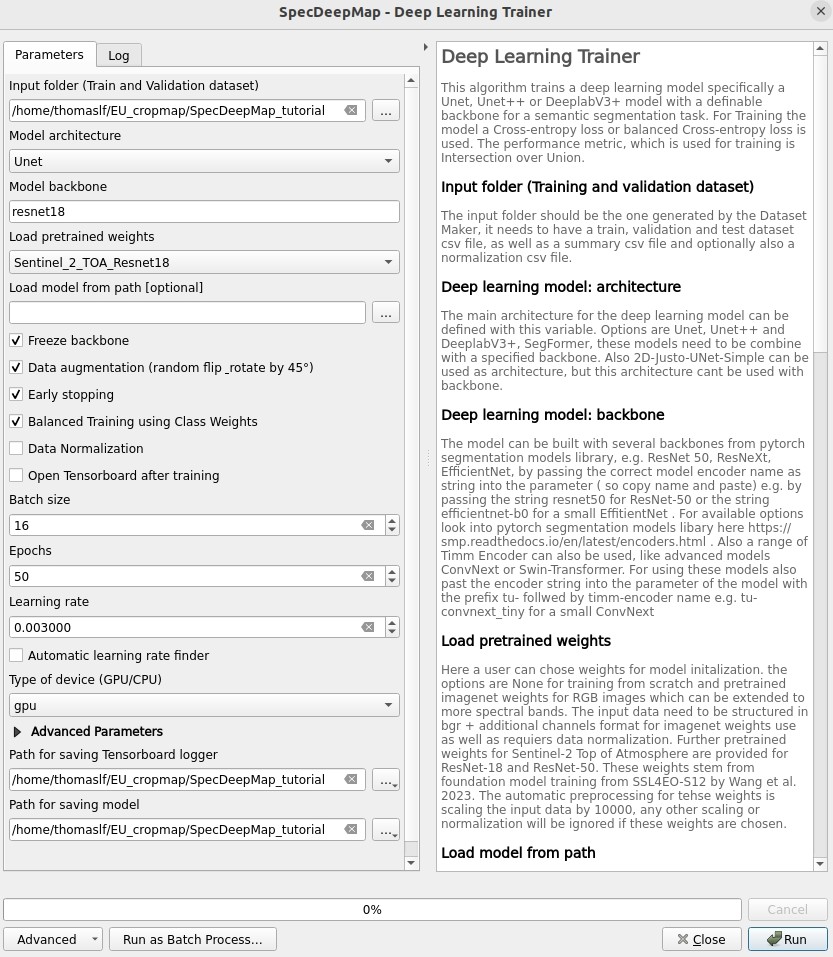
The Deep Learning Trainer algorithm, trains a deep-learning model in a supervised manner for a semantic segmentation task. It offers flexibility by enabling the training of various architectures, like U-Net, U-Net++, DeeplabV3+, and SegFormer paired with diverse backbones such as ResNet-50. A list of natively supported backbones can be found at https://smp.readthedocs.io/en/latest/encoders.html. Moreover, approximately 500 backbones from Pytorch Image Model Library, also known as Timm, are available, such as ConvNext and Swin-Transformers. A complete list of available Timm Encoders backbones is provided here: https://smp.readthedocs.io/en/latest/encoders_timm.html . To use any of the timm encoders ‘tu-’ must be added before the model string name.
As Input folder (Train and Validation dataset) use the ‘specdeepmap_tutorial’ folder. By model architecture and model backbone you can define possible model combinations. For this example leave the default values so Unet and ‘resnet18’.
(Side Note: In case you would like to use timm backbones instead with no pretrained weights or imagenet weights just copy a model name from this table https://smp.readthedocs.io/en/latest/encoders_timm.html and attach tu- before the model name e.g. for a small variant of Segment Anything Model 2 with the model name sam2_hiera_tiny you need to paste tu-sam2_hiera_tiny as backbone name.)
Change the Load pretrained weights parameter to Sentinel_2_TOA_Resnet18 to load the pretrained weights for Sentinel-2 TOA imagery stemming from Wang et al. 2022 (https://arxiv.org/abs/2211.07044).
We will use the default for the following parameter and leave them checked & activated (freeze backbone, data augumentation, early stopping and balanced Training using class weights)
As Batch size we use 16 and for Epochs 50, if you want to do the full training and have sufficient computation and downloaded the tutorial_large data. ( If you have less computational resources or use the small dataset folder use batch size of 4 and only train for 5-10 epochs). Further you can reduce the amount of epochs to 3, if you just want to later use the pretained model from the tutorial_small or tutorial_large folder.
As Learning rate we will use 0.003.
As type of device use GPU if available and installed for the enmapbox python environment. Otherwise use CPU, and reduce the epoch numbers ( e.g. 5-10)
As Path for saving tensorboard logger use the ‘specdeepmap_tutorial’ folder.
As Path for saving model use the ‘specdeepmap_tutorial’ folder.
Let’s run the model.
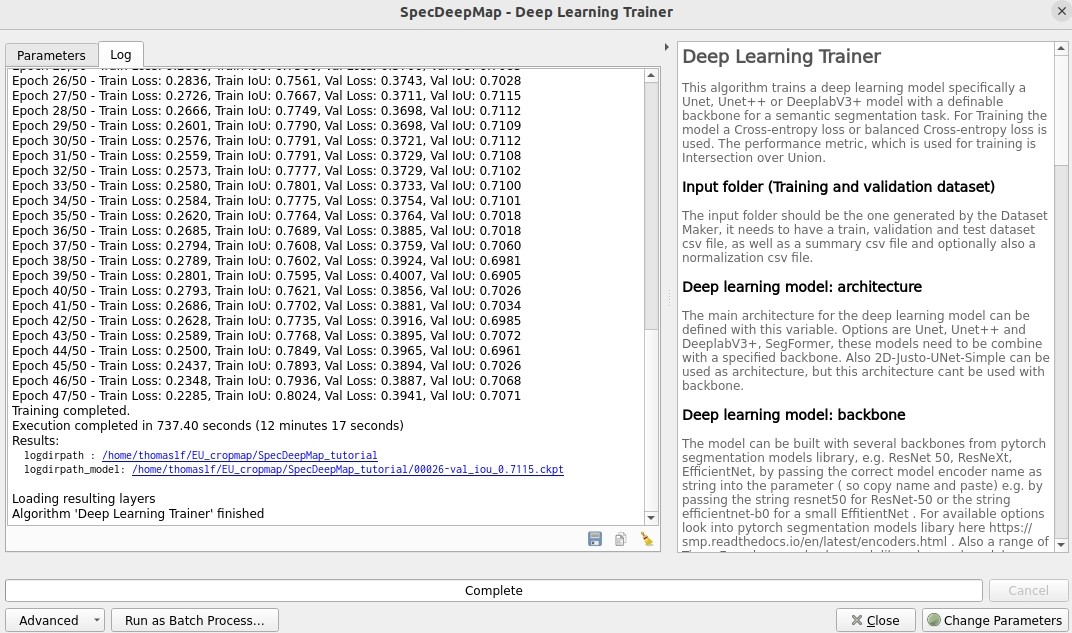
During training in the Logger Interface the progress of the training is printed after each epoch. (epoch means one loop through the training dataset). In the logger the train and validation loss is displayed, which should reduce during training and the train IoU and val IoU should increase.
The model uses the training data for learning the weights and the validation data is just used to check if the model over or underfits (if the train and validation values differ significantly).
After training the logger displays the best model path for the best model. In general you want to use the model with the highest IoU score on the validation dataset. This is also written into the model file name, so you can find it later again at any time.
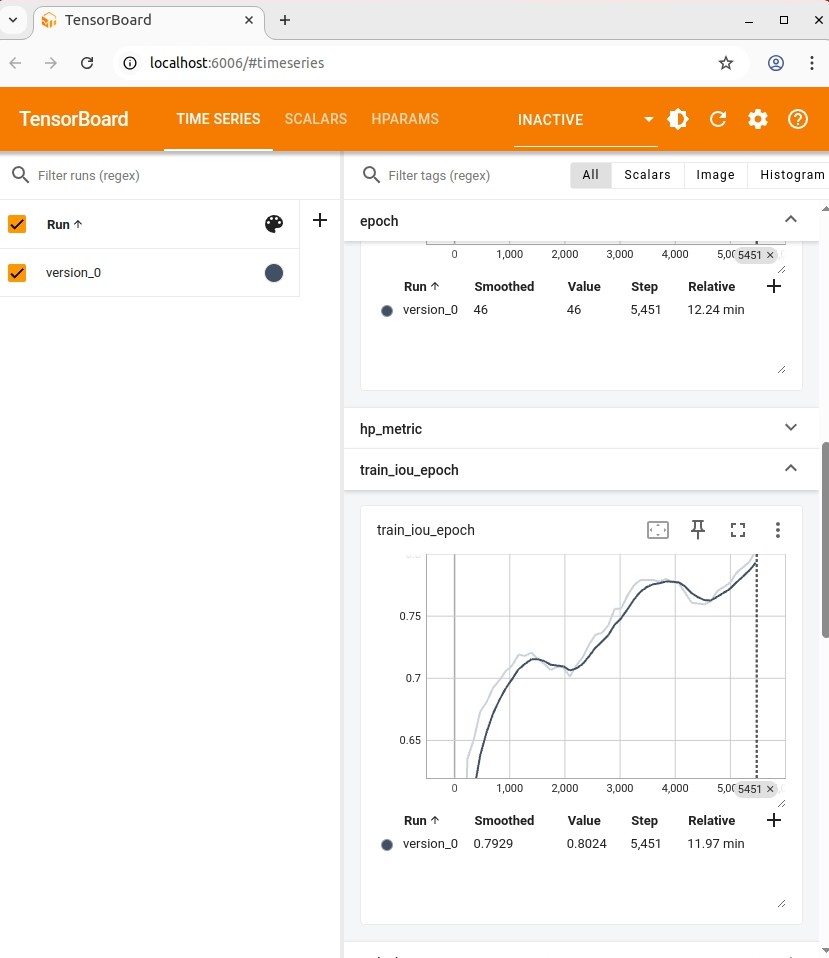
Here a logger visualization of the training we just performed. In our case with GPU for 47 epochs took around 12 min. ( 47 out of 50 epochs as early stopping stops training if val IoU is not increasing for 20 epochs)
Fig. 8.6.2 Visualization of IoU and Loss per epoch during training of Deep Learning Trainer
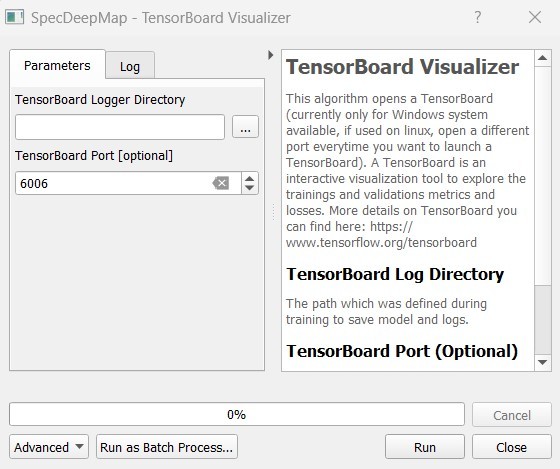
If you want to inspect the model behavior in more detail after the training you can use this algorithm and the logger location to open a TensorBoard, which is an interactive graphical environment to inspect model training behavior.
To call the TensorBoard Visualizer you need to define as input the location where you saved the model logger in the Deep Learning trainer algorithm.
Define for Tensorboard logger Directory the subfolder ‘specdeepmap_tutorial/lightning_logs’.
The default TensorBoard port is 8000. In windows there is no need to change the port as each tensorboard port will be terminated before a new tensorboard is initialized. In other systems the algorithm doesn’t support the port termination and it is necessary to define a different port each time to open a new tensorboard (Ports are also terminated if PC is shut down).
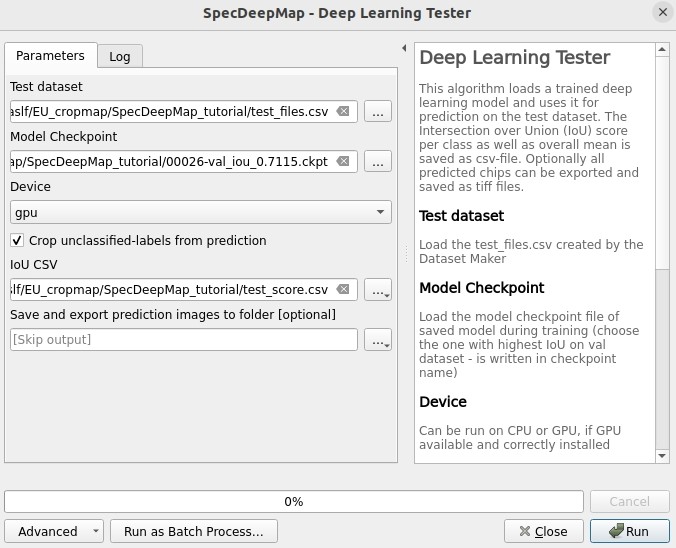
The Deep Learning Tester evaluates the performance of a trained model on the test dataset. Hereby it calculates the Intersection over Union Score per class as well as the overall mean.
For the parameter Test Dataset input the test_files.csv which we created with the Dataset Maker, it is located in the folder ‘specdeepmap_tutorial’.
As model checkpoint you can use the checkpoint file ‘00026-val_iou_0.7115.ckpt’ from the tutorial_small or tutorial_large folder ( both come with identical pretrained model), or load the model with the highest Val IoU from your training( score is written in created checkpoint file names).
Define the location where you want to save IoU CSV. Use ‘specdeepmap_tutorial’ as folder location and save a file test_score.csv in it.
Leave the remaining default values unchanged. Run the algorithm. If you load test_score.csv in enmapbox you can inspect the Iou score per class and mean on test dataset. For this load the CSV and open it attribute table.
Test results, depending on the dataset used, yield an IoU of approximately 0.49–0.56 IoU, which is in line with other foundation model performances on similar tasks.
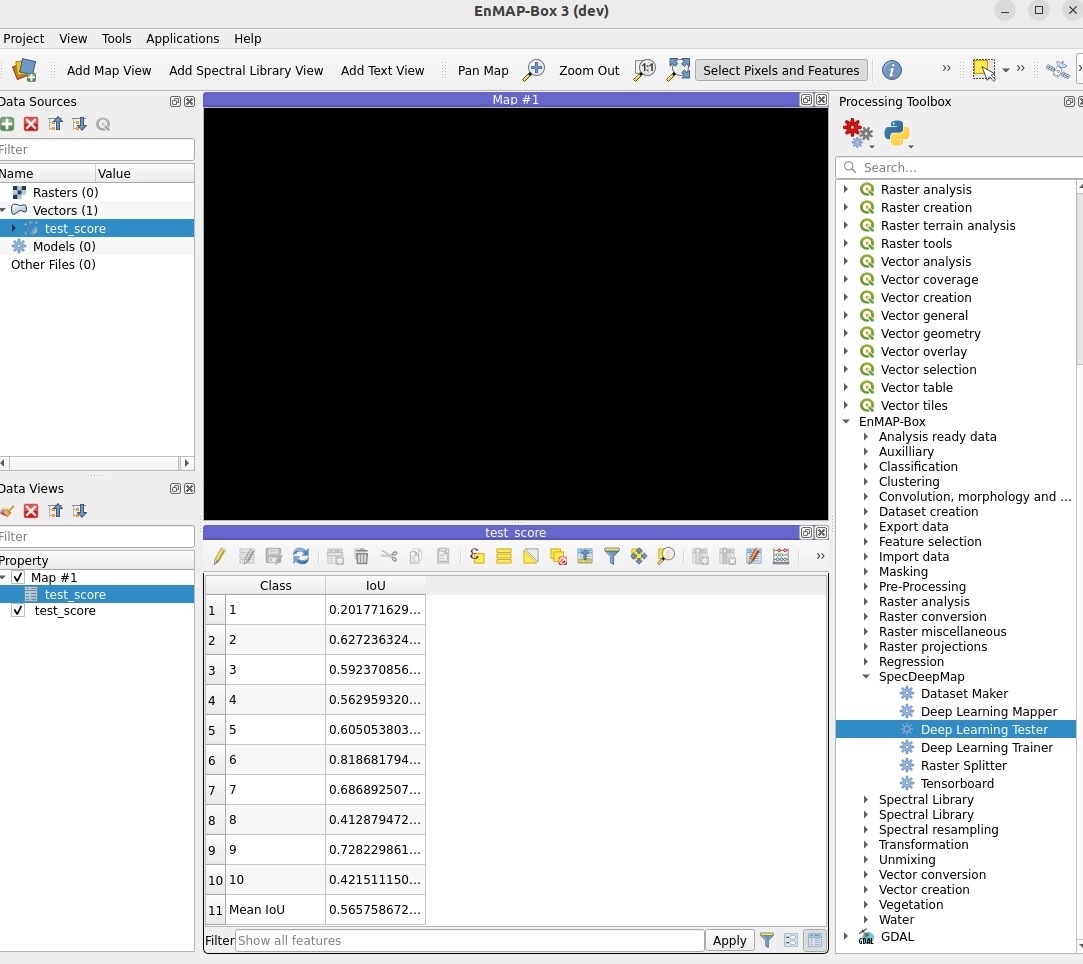
Here the test_score.csv visualized in EnMAP-Box, based on the tutorial_large dataset ( However, performance for tutorial_small is similar).
Fig. 8.8.2 Deep Learning Tester Output - IoU Scores on test dataset
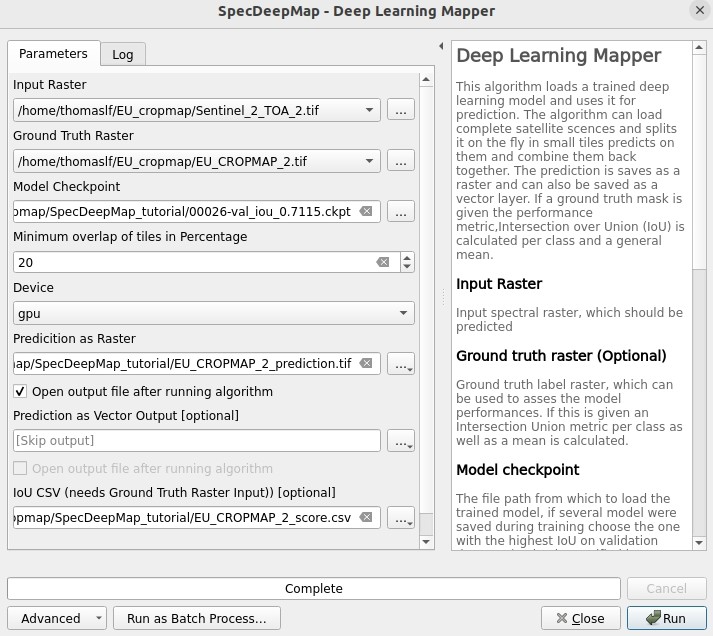
The Deep Learning Mapper can apply a trained model to an entire orthomosaic or satellite scene. In the background this algorithm automatically extracts overlapping image chips from the Input raster, predicts on them and crops them and combine them back together to a continuous large prediction image.
This enables easy employment of the model (also automatically apply same scaling and normalization as used in training of model). Throughout the predicting and cropping of the overlap areas the algorithm reduces boundary effect common in 2D - deeplearning models.
Use as Input Raster the spectral image Sentinel_2_TOA_2.tif and Ground Truth Raster: EUROCROPMAP_2.tif, or their small counterparts ‘Sentinel_2_TOA_2_tiny.tif’ and ‘EUCROPMAP_2_tiny.tif’,if you use the tutorial_small folder.
As Model Checkpoint you can use the checkpoint file ‘00026-val_iou_0.7115.ckpt’ from the tutorial_small or tutorial_large folder ( both come with identical pretrained model), or load the model with the highest Val IoU from your training( score is written in created checkpoint file names).
For the Minimum overlap of tiles in Percentage use 20.
Use ** Device** GPU if available, otherwise CPU.
For Prediction as Raster define the output: EUCROPMAP_2_prediction.tif in the ‘specdeepmap_tutorial’ folder.
For IoU CSV define output: EUCROPMAP_2_score.csv in the ‘specdeepmap_tutorial’ folder.
Run the algorithm.
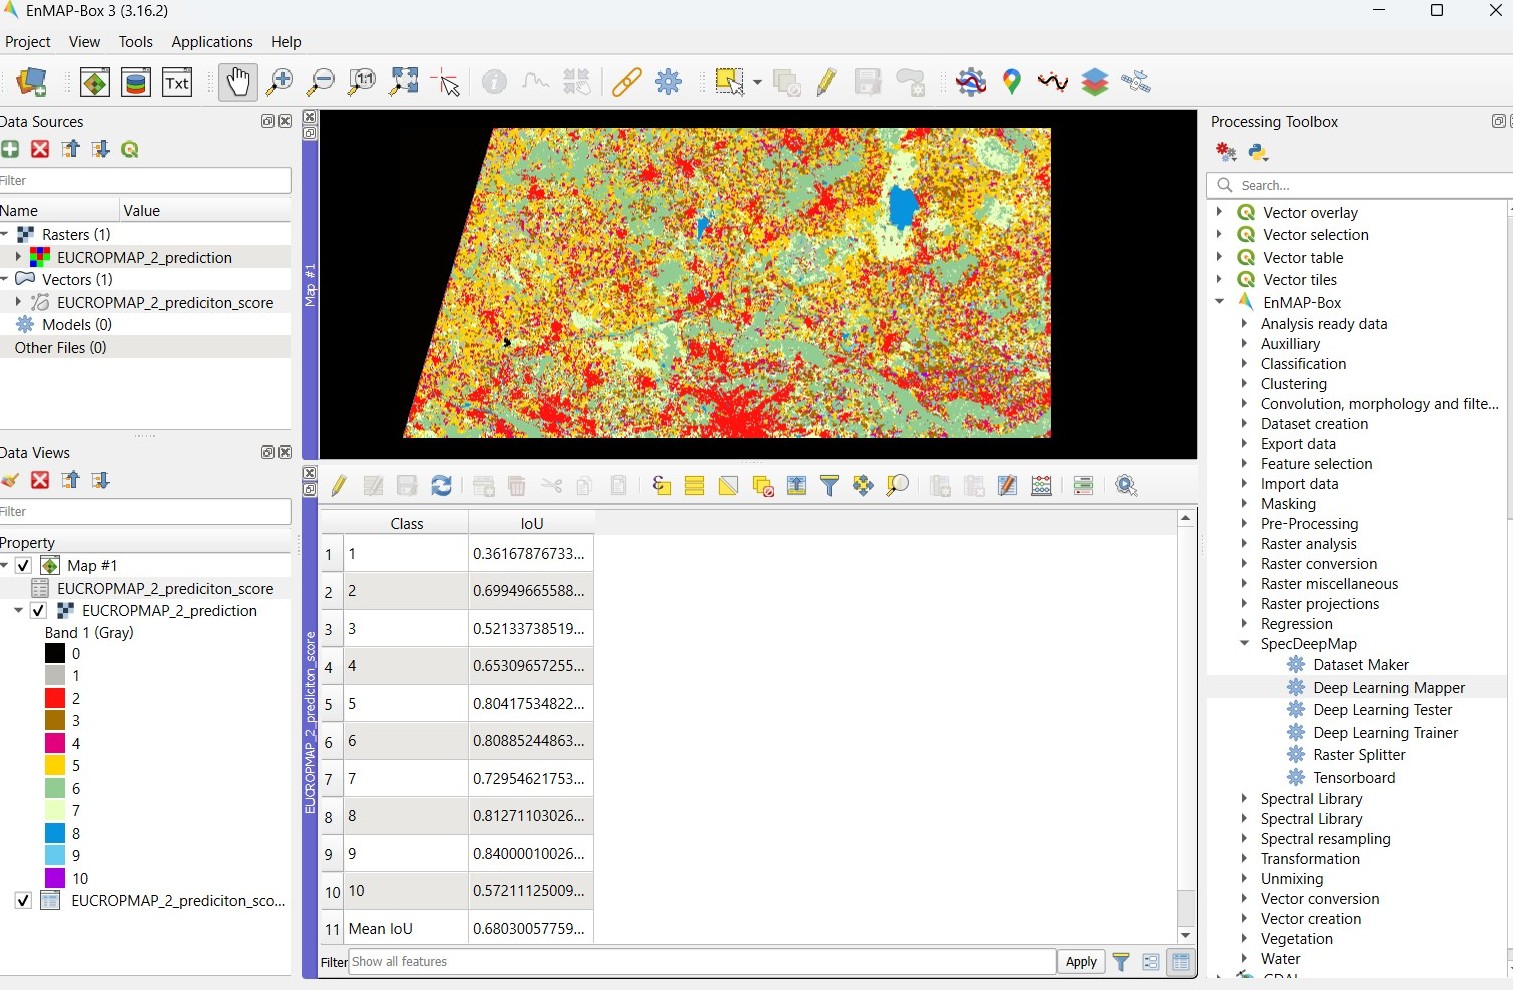
You can open the predicted Raster and CSV in the EnMAP-Box to inspect the prediction visually and the IoU score per class (Mean IoU is ~0,68-0.71).
Fig. 8.9.2 Deep Learning mapper Output:Predicted Raster and IoU score
Jakimow, B.; A. Janz; F. Thiel; A. Okujeni; P. Hostert and S. van der Linden, EnMAP-Box: Imaging spectroscopy in QGIS. SoftwareX, 2023. 23: p. 101507
Stewart, A.J.; C. Robinson; I.A. Corley; A. Ortiz; J.M.L. Ferres and A. Banerjee, TorchGeo: deep learning with geospatial data. Proceedings of the 30th International Conference on Advances in Geographic Information Systems, 2021
Wang, Y.; N.A.A. Braham; Z. Xiong; C. Liu; C.M. Albrecht and X.X. Zhu, SSL4EO-S12: A Large-Scale Multi-Modal, Multi-Temporal Dataset for Self-Supervised Learning in Earth Observation. ArXiv, 2022. abs/2211.07044