Graphical Modeler
Note
This section demonstrates how to use the Graphical Modeler in QGIS with EnMAP-Box processing algorithms in order to automate common workflows. Instead of manually clicking our way through the processing algorithms, we will build a model which combines all the steps of image classification and can potentially be reused and generalized for further applications.
You can find general information on the Graphical Modeler in the QGIS documentation.
Start the EnMAP-Box and load the test dataset under .
In the menubar go to . In the Modeler you have two major items or building blocks, which are the Inputs and Alogrithms. The latter basically lists all algorithms available in the QGIS Processing Toolbox and the first lists all available types of inputs, which can be used by the processing algorithms.
For image classification we need at least an input raster and a reference dataset. In case of the EnMAP-Box testdata the reference dataset is a point shapefile. Under Inputs search for Raster Layer and select it (double-click or drag-and-drop). As Parameter Name you can for example choose
input_image. Mind how this input graphically appears in the main window. Now again, look for Vector Layer, double-click, and assign a name, e.g.reference_vector.Note
You can of course change the Parameter name as you wish, but it might be easier to follow this guide when you use the suggestions.
Add a Vector Field input to the model. Enter
reference_fieldas Parameter name andreference_vectoras Parent layer.Now we need the Classification from Vector algorithm in order to rasterize the reference dataset. Find it in the Algorithms tab and select it. Now enter the following parameters:
Pixel grid: input_image
Vector: reference_vector
Class id attribute: reference_field
Minimal overall coverage: 0.0
Minimal dominant coverage: 0.0
Oversampling factor: 1
Caution
If you want to control the label names and colors of the output raster, you have to add a
.jsonfile to your vector dataset, see here. If you use the test dataset the json file is already supplied.Now add the Fit RandomForestClassifier algorithm to your model. In the dialog, select
input_imageas Raster and under Labels select'Output Classification' from algorithm 'Classification from Vector'. Leave the rest at default and click OK.In the next step select the Predict Classification algorithm. Under Raster select
input_imageand under Classifier select'Output Classifier' from algorithm 'Fit RandomForestClassifier'(click on the button and
switch mode to Algorithm Output). Enter a name under Output Classification, e.g.
button and
switch mode to Algorithm Output). Enter a name under Output Classification, e.g. predicted_image. Confirm with OK.The model is already able to run and perform an image classification, but we will add the generation of an accuracy assessment: Look for the Algorithm Classification Performance and select it. Choose
'Output Classification' from algorithm 'Predict Classification'as Prediction and'Output Classification' from algorithm 'Classification from Vector'as Reference. Specify a name under HTML Report, for exampleaccuracy_assessment.Under Model properties you can specify a name and a group for your model and save it.
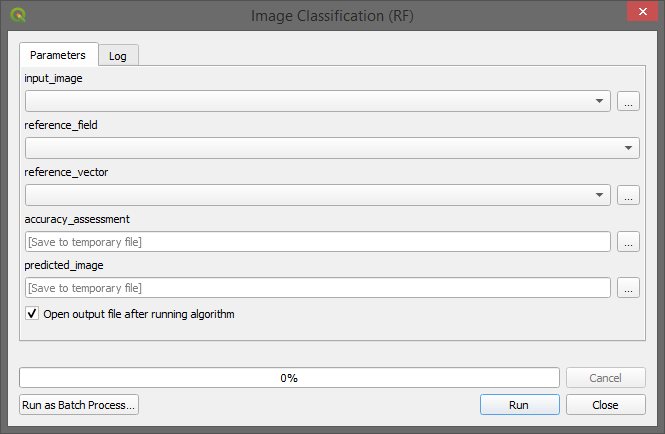
Click the run button or press F5 to test your model. Use the following settings:
input_image:
enmap_berlin.bsqreference_vector:
landcover_berlin_point.shpreference_field: level_2_id
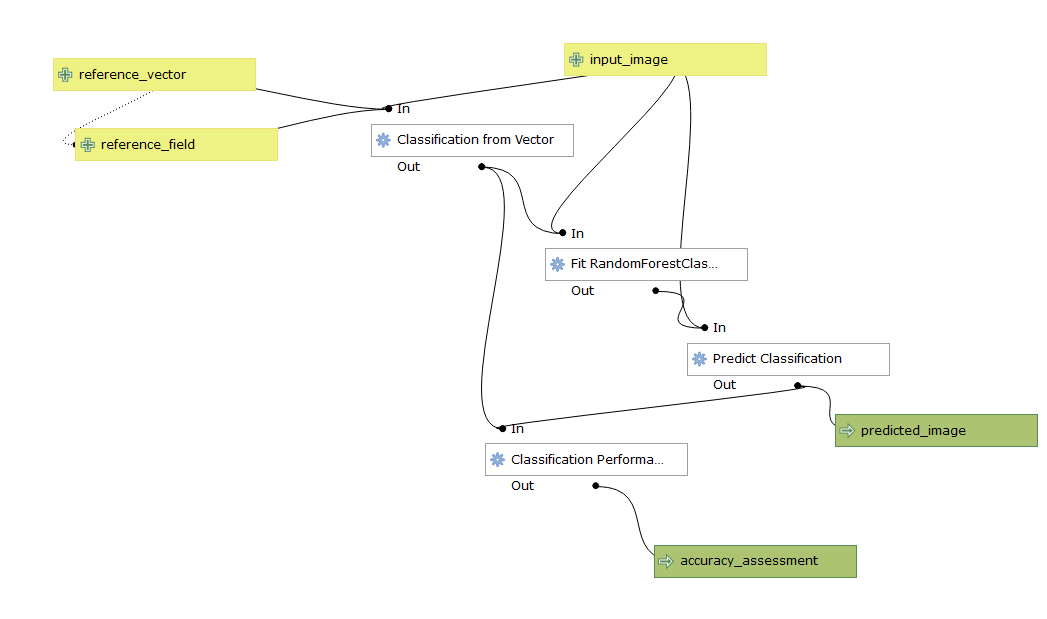
Fig. 18 Screenshot of the final model
After saving, your model will also appear in the Processing Toolbox:
… and can be openend as a regular processing algorithm:
Final remarks
Mind that this example was quite specific to the EnMAP test dataset. You might want to alter the model in a way that it is more generalizable or fitting for your specific use cases.
Also, consider extending the model inputs to have even more parameters to select from, e.g. by using the Number input type to make the parameter Minimal overall coverage from the algorithm Classification from Vector directly specifiable as a parameter in your model dialog.
Consider including a separate reference dataset as an additional selectable input parameter (for the accuracy assessment).